Showing posts with label Design Studio. Show all posts

Thursday, February 27, 2014

Get Your Glow On Invitations


My oldest daughter is turning 12 next month and she wanted a Glow-in-the-Dark/Sleepover party so I created these GET YOUR GLOW ON invitations.

I used these items to create my invitations:
  • Color Bok Day Glo cardstock
  • black and white cardstock
  • Design Studio
  • Winter Woodland Cricut cartridge - square
  • Hannah Montana Cricut cartridge - font 
  • Computer generated font - inside


I am entering my invitations in the following challenges and linky parties:
Thanks for visiting my blog and I hope you enjoyed my GET YOUR GLOW ON invitations.

Wednesday, May 8, 2013

Just a Lonely Zombie


It has been over a month since I created anything, mainly because I was going through radiation for the breast cancer I had. Now that it is over and my everyday isn't being interrupted by having to go to radiation I feel I have the time and the frame of mind to be creative again!

So for my 1st project since being done with radiation I created this card for Halloween. I know, your thinking Halloween in May? Yes, I'm always thinking ahead to the next Halloween. While browsing through some of the blogs I follow I came across Airless Chambers which is another Rick St. Dennis (who has amazing digital stamps) blog. They were offering a FREE Singing Zombie digital stamp, plus a challenge to use that digital stamp in the currant challenge. I jumped on it and started on my creation.

I first started looking at some images of The Walking Dead zombies to determine how I wanted to color my zombie. Then since this is suppose to be a singing zombie I decided to search the Internet for songs about zombies and came across a couple I liked. I decided to use "The Zombie Song" as my muse. Then I just started pulling out things from my stash to finalize my card.

I used these items to create my card:
  • Singing Zombie FREE digital stamp
  • sponged white, brown and green ink on the zombie
  • Sharpie markers - hair, eyes, mouth, exposed body parts and background
  • red pen - blood shot part of the eyes
  • Glossy Accents - eyes, mouth and exposed body parts
  • Design Studio - weld ZOMBIE
  • Alphalicious Cricut cartridge - font
  • Brain from Creepy Glowbugg which I attached it to a skewer (painted silver) to look like a microphone
  • misc. ribbon
  • Studio 112 adhesive gems

On the inside I used these items:
  • computer generated sentiment
  • Martha Stewart Goo edge punch

I am entering this card in the following challenges and linky party:
Thank you for stopping by and checking out my Just a Lonely Zombie card.


Saturday, March 16, 2013

Camouflage Onesie Shape card


Last month one of my nieces had an emergency C-section and gave birth to a baby boy 11 weeks early. Baby is currantly still in the NICU but progressing very well and Mom is recovering very well also.  I knew about 2 months ago or so that the baby's bedding was going to be camouflage so I knew that when the time came I was going to use that for whatever creation I was going to make. Since the baby came early I have only been able to make a card and this is it. I totally love the way it turned out and can't wait to get involved in more baby projects using the camouflage. This is only the beginning.

Here you can see where I welded the onesie together in the Design Studio:


Here is just a close up of the inside where I did some faux stitching and stamped my sentiment:


I used these items to create my Camouflage Onesie Shape card:
  • Design Studio - to weld the onesie together
  • New Arrival Cricut cartridge - onesie
  • Pooh Font Cricut cartridge - "100 % Boy"
  • buttons
  • My Craft Spot Clear Stamps - In and Out - Set #2 - the inside sentiment
  • Baby wooden stamp - on the inside
  • green gel pen - faux stitching - on the inside
I am entering this shape card in the following challenges and linky party:
This was such a fun and easy card to make. Thank you for stopping by and checking out my Camouflauge Onesie Shape card.

Saturday, February 23, 2013

Chicken Pot Pie recipe layout


Here is a little better pic.


First I must say sorry about the awful photos I will replace them ASAP but I wanted to make sure I was able to enter my Chicken Pot Pie recipe layout in the following challenges and linky party:
This is the recipe.


This is my hidden journaling.


The 2nd page is my girls and my Mom


The chicken


I used these items to create my Chicken Pot Pie recipe layout:
  • Design Studio - weld the letters
  • Fabulous Finds Cricut cartridge - file folder and insert
  • Jasmine Cricut cartridge - title font
  • Everyday Paper Dolls Cricut cartridge - rolling pin (2nd page)
  • Animal Kingdom Cricut cartridge - chicken (2nd page)
  • Misc. clear stamps - "Traditions" and "Family"
  • computer generated font - recipe and "Family" journaling
  • Fiskars Sea Pearls corner punch - recipe
  • round metal clip - hold file folder and hidden journaling together
  • Black Sharpie Marker - rolling handles
  • google eyes - chicken
Thank you so much for stopping by and checking out my Chicken Pot Pie recipe layout.


Friday, February 22, 2013

Another Breast Cancer Awareness Thank You card


So here is the other Breast Cancer Awareness Thank You card I made for one of my nurses who cared for me over the last 5 months during my chemo treatments. My design was inspired by the challenge over at Mojo Monday (see the sketch below). You can see the other BCA Thank You card HERE.

I tried to get a picture of this circle to show off the stickle I used around the edge of the circle and on the dots but unfortunately it didn't catch the light very well.


Here is the very simple inside...I left it this way so I could leave my own personal thank you.


I used these items to create this BCA Thank You card (ALL of which I had on hand):
  • Design Studio
  • George and Basic Shapes Cricut cartridge - circles
  • Ultimate Creative Series Cricut cartridge - Awareness Ribbon
  • White heart shape brade - on the awareness ribbon
  • ribbon - on the front and inside of card
  • Swiss dots embossing folder - on the pink circle
  • Stickles - on the pink circle
  • Misc. clear "Thank You" stamp - on the pink circle
  • Stickabilites Breast Cancer Awareness ribbon sticker - on the inside

I am entering this card in the following challenges and linky party:


Thank you so much for stopping by and checking out my BCA Thank You card.

Breast Cancer Awareness Thank You Easel card


Well, yesterday was my last day for chemo, treating me for breast cancer. Making paper crafts of all sorts was just one of the things I would do during these treatments to pass the time. Plus, it really was the only time I could have peace and quiet to do my crafts. So since this was my last treatment I wanted to make Thank You cards for the 2 nurses who have been there helping me through it over the last 5 months, and this is one of them.


I wrote my own personal thank you on the underside. It is bittersweet to know I won't be going back but to only get my port flushed every six weeks until it is removed and any appointments that I may have to go to see the doctor. These nurses are fabulous and I just wanted to let them know they are appreciated!

I used these items to create my BCA Thank You easel card (ALL of which are products I had on hand):
  • Design Studio - weld the "THANK YOU"
  • Ultimate Creative Series Cricut cartridge - Awareness Ribbon
  • Street Signs Solutions Crciut cartridge - "THANK YOU"
  • White heart brads
  • White gel pen - "THANK YOU" 
I am entering this card in the following challenge and linky party:
Thank you so much for stopping by and checking out my BCA Thank You easel card.

Saturday, February 9, 2013

Valentine's Day 2012 - Gifts layout (page 2)


So here it is, my 2nd page, as I had mentioned in my blog post from Valentine's Day 2012 layout that I was planning on doing to display my kids gifts.  I finally finished it and I am totally satisfied with it.  Just the word "gifts" says it all.  My girls are my gifts and the layout displays their gifts from Valentine's Day 2012.  My youngest daughter (at the top) received "Elmo Loves You" DVD and my oldest daughter (at the bottom) received "Monster High 3" book. The both really loved their gifts.


I used these items to create this layout:
  • Design Studio - to weld "gifts"
  • Storybook Cricut cartridge - font
  • Sweethearts Cricut cartridge - heart
  • Foam tape - 2 thicknesses behind the heart
  • Martha Stewart lace heart edge punch - top and bottom of page
  • Recollections bling - top and bottom of page
  • Glossy Accents - "gifts" and the red parts of the heart
  • Stickles - below the heart to create a flower effect
I will be entering this layout in the following challenges and linky party:
Thank you for stopping by and checking out my Valentine's Day 2012 - Gifts layout (page 2).

Here is a look at the full layout all together:

Saturday, January 26, 2013

Valentine's Day 2012 layout

 
 So today I have here for you my Valentine's Day 2012 layout. This photo does not show off this beautiful red paper at all.  It has vines of hearts all over it but it just wouldn't photograph, but believe me it is gorgeous. Anyhow, last year there girls just had so much fun with our little celebration I had to scrap it.  The expression on my daughter's faces really show off their personalities. Kaitlyn, my oldest, is my photogenic child and Jaidyn, my youngest, is my goofball. I'm so pleased with the way everything turned out on this layout. I have plans to make a second page to display their gifts but that will have to be another day.

Here shows off the top part of the page: the bling, the Martha Stewart edge punch, and the title.


This portion shows off the great picture of my girls and a little more bling. I actually put together 2 tear drop gems to make a heart.


Lastly this is the bottom of the page: it shows off the year, a little bit more bling, and again the Martha Stewart edge punch.


 I used these items to create my Valentine's Day 2012 layout:
  • Design Studio - to weld the title
  • Storybook Cricut cartridge - font
  • Martha Stewart lace heart edge punch - top and bottom of page
  • Recollections bling - top and bottom of page
  • Metal "Love" embellishment - on small picture of my youngest daughter
  • Studio 112 tear drop gems - on main photo
I will entering this layout in the following challenges and linky party:
Thank you so much for stopping by and checking out my Valentine's Day 2012 layout.

Monday, January 14, 2013

My 1st Shaker Card


Yes, you read it right, this is my very 1st shaker card.  I have been wanting to try one of these for a very long time and now I have. I did make some mistakes along the way but I learned from them and I feel very confident that I won't make those same mistakes again.


I used these items to create my shaker card:
  • Design Studio
  • Joys of the Season Cricut cartridge - snow globe (can't remember the last time I used this cartridge)
  • Create a Critter - penguin (can't remember the last time I used this cartridge either)
  • stickles
  • glitter (have had for many years)
  • Close to my Heart clear stamp sentiment - S110 Holiday Magic (never used before)
  • ribbon (had since last year)
  • iridescent snowflakes (have had for many years)
  • Clear Craft Plastic (had since last year)
Here is a view of the bottom and inside of the card:


I am entering my shaker card in the following challenges:
I think I did pretty good for my very 1st shaker card (toot toot my horn). Thank you so much for stopping by and checking out my Penguin Snow Globe Shaker card.

Tuesday, January 1, 2013

Happy New Year 2013 Party Hats


Happy New Year!!! I hope everyone is starting the new year off to a good start! I'm happy to be giving you a look at my first project of the New Year! I created a couple of New Year's party hats to help ring in the new year with my girls!


Here's is my youngest daughter wearing her hat proudly!


And here is my oldest daughter, looking a little bit tired just before midnight, wearing her hat.


Now since my youngest daughter went to sleep I borrowed her hat to wear, with my oldest daughter, while the New Year's Eve ball dropped!

 
I used these items to make my hats:
  • Life's a Party Cricut cartridge - hats
  • Lyrical Letters Cricut cartridge - "Happy New Year" and "2013"
  • feathers (stash)
  • ribbon (stash)
  • Martha Stewart glitter (I've had for over a year)
  • DCWV the Glitter cardstock stack (I've had for probably 2 years) - hats
  •  
I am entering my party hats in the following challenge:
 
This was such a fun and easy project, I will for sure be making more party hats in the future! Thank you for stopping by and checking out my New Year's party hats!


Friday, December 7, 2012

Countdown to Christmas Cookie Tray


Today I bring to you my Countdown to Christmas Cookie Tray!  I was inspired to do this project when I saw something similar on scrapbook.com.  This was such a fun project to do. 
 
I used these items to make this project:
  • 9 x 13 Cookie tray from The Dollar Store
  • Design Studio
  • Jolly Hollidays Cricut Lite Cartridge for the house and Santa
  • Winter Woodland Cricut Cartridge for the snowman
  • Everyday Paper Dolls for the snow drifts
  • Designer's Calendar for the numbers
  • clear yellow folder divder for the windows
  • red Stickles for the reindeer's nose
  • Glossy Accents for Santa's belt and boots
  • Iridescent Glitter on the snow
  • Double stick foam tape and magnet on the back of Santa
  • Ribbon so it can be hung


I will be entering my Countdown to Christmas Cookie Tray in the following challenges:
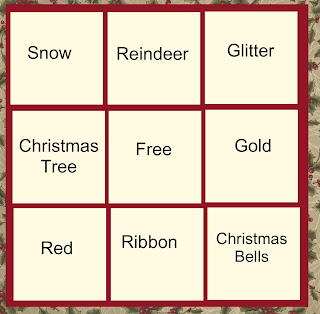
I choose snow, reindeer and glitter! - open til 12/9
Thank you so much for stopping by and checking out my Countdown to Christmas Cookie Tray.

Monday, October 15, 2012

Wicked Best Witches Cauldron Treat Holder


 Tonight I bring to you a cute little treat holder that I created for my daughter's 5th grade Halloween party...28 of these cute little cauldron treat holders to be exact!  I created the base (orange part) in the Design Studio by welding them together and just cut out the coordinating pieces.


Here I applied Glossy Accents to the bubbling liquid (green part), to give it some shine.  I stamped on the front with the "Wicked Best Witches" stamp from Bug Bites Stamps  - All Year Round stamp set. 


I used a brown Sharpie marker to color the stick of the blow pop to give it the look of a big wooden spoon.  I then punched a hole through the bubbling liquid to push the end of the stick through.


I used these items to create this Halloween Treat Holder:
  • Design Studio
  • Mini Monsters Cricut cartridge - cauldron
  • Glossy Accents - on the bubbling liquid
  •  Bug Bites Stamp - "Wicked Best Witches"
  •  brown Sharpie marker - on stick of blow pop
  •  Blow Pop
  •  Glue Spots - to hold blow pop in place
  •  
I am entering this Halloween Treat Holder in the following challenges:
Thank you so much for stopping by and checking out my Wicked Best Witches Cauldron Treat Holder.


Sunday, October 7, 2012

The Jersey Devil


When I saw the challenge over at Haunted Design House - HDH #153 - Creepy Cryptids I knew right away what I wanted to do...The Jersey Devil!  Being a former Jersey Girl myself I know all too well about the Jersey Devil.

Legend has it that in 1735, a Pines resident known as Mother Leeds found herself pregnant for the thirteenth time. (Leeds is the name of one of New Jersey’s earliest settlers, and many descendants of the Leeds family can still be found throughout NJ to this day.) Mother Leeds was not living a wealthy lifestyle by any means. Her husband was a drunkard who made few efforts to provide for his wife and twelve children. Reaching the point of absolute exasperation upon learning of her thirteenth child, she raised her hands to the heavens and proclaimed “Let this one be a devil!”
Mother Leeds went into labor a few months later, on a tumultuously stormy night, no longer mindful of the curse she had utter previously regarding her unborn child. Her children and husband huddled together in one room of their Leeds Point home while local midwives gathered to deliver the baby in another. By all accounts the birth went routinely, and the thirteenth Leeds child was a seemingly normal baby boy.

Within minutes however, Mother Leeds’s unholy wish of months before began to come to fruition. The baby started to change, and metamorphosed right before her very eyes. Within moments it transformed from a beautiful newborn baby into a hideous creature unlike anything the world had ever seen. The wailing infant began growing at an incredible rate. It sprouted horns from the top of its head and talon-like claws tore through the tips of its fingers. Leathery bat-like wings unfurled from its back, and hair and feathers sprouted all over the child’s body. Its eyes began glowing bright red as they grew larger in the monster’s gnarled and snarling face. The creature savagely attacked its own mother, killing her, then turned its attention to the rest of the horrified onlookers who witnessed its tempestuous transformation. It flew at them, clawing and biting, voicing unearthly shrieks the entire time. It tore the midwives limb from limb, maiming some and killing others.

You can read more about The Jersey Devil HERE

Here is a closer look at the title and the devil's wings, to show off the texture:


I used the following items to create this layout:
  • Design Studio - I welded the wings, the horse body, horns, tail, and claws to the wings
  • Wrap It Up Cricut cartridge - wings
  • Old West Cricut cartridge - horse
  • Animal Kingdom Cricut cartridge - horns and claws on the wings
  • Accent Essentials Cricut cartridge - tail
  • DCWV The Immortal Love Stack - background paper
  • Fiskers Texture plate (leather) - on the wings
  • Black Sharpie Marker - wings, mane, claws, claws on the wongs, tail, hooves and horns
  • black ink - title
  • Glossy Accents - title, claws, claws on the wings, and hooves
  • foam squares - behind the title
  • Pop-up glue spots - behind the devil

I am entering this layout about The Jersey Devil in the following challenges:
Thank you so much for stopping by and checking out my Jersey Devil layout.