Showing posts with label zombie. Show all posts

Friday, October 10, 2014

Decaying Zombie Head Makeover/Countdown to Halloween Day 10

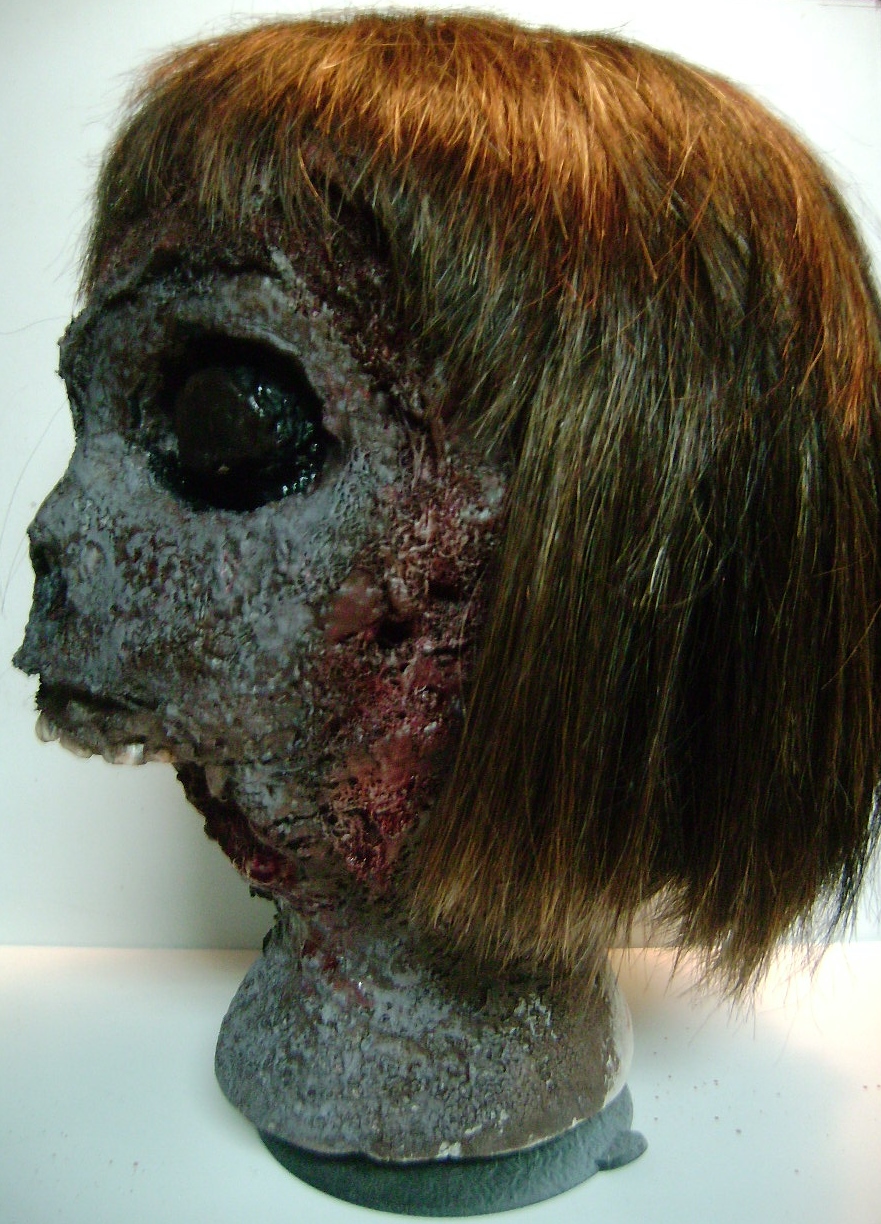
Early last year I had created a Decaying Zombie Head and well this year I gave her a makeover.


You can see I hollowed out her eyes.  If I remember correcting when I was creating this last year no matter what I tried the eyes just weren't working for me so I left them as is...that is until now. I also lightened up her skin and bloodied areas. And that is pretty much it. 


I hope you liked my Decaying Zombie Head Makeover and thanks for stopping by.

Sunday, September 15, 2013

Zombie Parts - HDH #175 - Halloween in your Face

Well it is getting closer that time of year again, my favorite holiday, Halloween. So of course when I saw the challenge over at Haunted Design House - Halloween in your Face, you are to create a dark, Gothic, or Halloween based art piece to start celebrating for the upcoming holiday, I knew I would be participating. A couple of weeks ago I had acquired some dollar store treasures: a plastic foot and hand and I knew that I could improve their appearance.


I first started with a base coat of gray spray paint. I then decided it needed a more fleshy look, so I took some gauze and just started pulling it in every direction and covering the foot. I then sprayed it again with red, white and black spray paint. Lastly I hand painted the bones and toe nails with craft paint. I repeated all of this for the hand as well.


I am entering my Zombie Parts in the following challenge:
I had to add just one more photo. Does it resemble a very popular horror movie?


Pretty close...you get the idea though.

I had a blast making my new Zombie Parts for this Halloween...who knows where they will end up but know for sure they will be out for all to see on Halloween night.

Saturday, August 31, 2013

Spike - HDH #174 Macabre Monday - Nailed It!

Well it has been a very long time since I created anything. The Summer months have been extremely hot in Arizona and just cleaning the house really takes all of the energy out of me, not to mention that my craft area is in my kitchen which gets the full setting sun in the afternoon and evening. So since we have been finally getting some rain and lower temps I was able to get a project done.


Meet Spike. He is a Goth Zombie Baby, well just a baby head! A couple of months ago while at the local Savers my oldest daughter found 2 baby doll heads for just .99 cents each. We are always on the lookout for items that can be repurposed and/or created into art. With the most recent challenge over at Haunted Design House titled Nailed It! I knew that I wanted to use one of my baby doll heads for it. I also knew right off the bat I didn't want to do the well know and well loved row of nails down the middle of the head because of fear that everyone would do it. So then the idea came to me, a Goth Baby and I thought the neck was the perfect place for a spiked collar. From that point on more ideas like the nail ear ring and the lip ring came to life.


But since I like a little gore this had to be a zombie baby and I had to create the bite mark, which you can see is right on the head.


I'm surprised I actually got this done because it seemed like everything I tried was screwed up, my spray paint was clogged, I dropped the head after painting it, and the nails were too small so they didn't stay where I wanted them to go. This was a project full of compromise but I am happy with the final outcome!

I used these items to create Spike:
  • baby doll head
  • White spray paint
  • Black, gray, brown, yellow and pink craft paint
  • Fake blood
  • Glossy accents - eyes
  • Part of my daughters old belt - collar
  • Nails - collar and ear ring
  • Silver paint marker - nails in collar
  • Chain ring - lip ring
I will be entering this in the following challenge:
Thank you for stopping by and checking out my Spike hope you enjoyed him.

Wednesday, May 8, 2013

Just a Lonely Zombie


It has been over a month since I created anything, mainly because I was going through radiation for the breast cancer I had. Now that it is over and my everyday isn't being interrupted by having to go to radiation I feel I have the time and the frame of mind to be creative again!

So for my 1st project since being done with radiation I created this card for Halloween. I know, your thinking Halloween in May? Yes, I'm always thinking ahead to the next Halloween. While browsing through some of the blogs I follow I came across Airless Chambers which is another Rick St. Dennis (who has amazing digital stamps) blog. They were offering a FREE Singing Zombie digital stamp, plus a challenge to use that digital stamp in the currant challenge. I jumped on it and started on my creation.

I first started looking at some images of The Walking Dead zombies to determine how I wanted to color my zombie. Then since this is suppose to be a singing zombie I decided to search the Internet for songs about zombies and came across a couple I liked. I decided to use "The Zombie Song" as my muse. Then I just started pulling out things from my stash to finalize my card.

I used these items to create my card:
  • Singing Zombie FREE digital stamp
  • sponged white, brown and green ink on the zombie
  • Sharpie markers - hair, eyes, mouth, exposed body parts and background
  • red pen - blood shot part of the eyes
  • Glossy Accents - eyes, mouth and exposed body parts
  • Design Studio - weld ZOMBIE
  • Alphalicious Cricut cartridge - font
  • Brain from Creepy Glowbugg which I attached it to a skewer (painted silver) to look like a microphone
  • misc. ribbon
  • Studio 112 adhesive gems

On the inside I used these items:
  • computer generated sentiment
  • Martha Stewart Goo edge punch

I am entering this card in the following challenges and linky party:
Thank you for stopping by and checking out my Just a Lonely Zombie card.


Sunday, March 17, 2013

Decaying Zombie Head


I am super uber excited to bring to you my Decaying Zombie Head. I have been thinking about this all week long and I am so glad I did it.

This all started with your traditional styrofoam wig head, which I actually had on hand because it was holding and still is holding my wig. I got the wig and wig head months ago when I was getting treated for breast cancer from The American Cancer Society for FREE. Now that I am done with my chemotherapy and my hair is growing back I am using my wig less often. BTW...I AM CANCER FREE!!! I got the news this past Thursday, but I still have 6 weeks of radiation which I start this week.

Anyhow back to my decaying zombie head. I looked all over the internet for techniques and just decided to do what I felt was capable of doing. I cut off and carved out the nose, then the eyes, then chopped off the chin and lower jaw, and then began just carving out wounds and such all over the face. Then I applied some batting with some spray adhesive. After letting that dry for a while I hot glued the teeth (which I had from last years zombie make-up kit) into the mouth. Now it was time to give this zombie some color. I spray painted the entire head with gray spray paint (which I also had on hand from making tombstones  years ago). I then applied brown, red, black and light blue craft paint. I had a bit of trouble with what to do with the eyes, nothing seemed to work and I still am not totally thrilled with it but for the most part I am happy with everything else. I then had to add some blood, fake blood from my Halloween stash. I finally added the wig to finish it off.  I love the way she turned out and plan to do more, many more!

Here is a couple of side views:


I will be entering my Decaying Zombie Head in the Haunted Design House Challenge #162 - Drop Dead Gorgeous

Thank you for stopping by and checking out my Decaying Zombie Head, I hope you liked her.

Friday, January 18, 2013

Zombie Walk 2012 Layout


I am super excited to share with you today my 2 page Zombie Walk 2012 layout. I've been wanting to create this layout ever since the Zombie Walk in October.

This was the 1st year we were able to participate and I wasn't gonna let anything get in my way. The week before I had received my 2nd round of chemo to treat my breast cancer. When I had my labs drawn the next week, the week of the Zombie Walk, it was determined I was neutropenic. Which basically means all of my blood counts were extremely low or zero and that made me very susceptible to infection. So I was ordered to receive neupogen shots over the next 5 days, the last day being the night of the Zombie Walk. Plus, the doctor did want me to get a blood transfusion but I refused for personally reasons.

So the day of the Zombie Walk my husband and I were frantically trying to finish my daughter's Sam costume and I was taking my daughters across town to The Railroad Park to attend the NICU Halloween event for preemie graduates, which my youngest daughter is.  We had a really nice time. I ran into a co-worker and the family that my daughter shared a room with in the NICU. The girls got their faces painted, road the merry-go-round and the train.  Then it was rush, rush, rush home, drop the kids off and then get my last neupogen shot. Plus during all of this I was trying to find a hospital gown to wear to the Zombie Walk.  Thankfully for my nurse at the hospital, she gave me one!  Then it was a rush to get home again, still trying to finish my daughter's Sam costume and get myself and youngest daughter ready for the Zombie Walk.

We ended up just a little late and missed the beginning of the walk but joined right in. I finally felt like I belonged somewhere. Everyone was dressed in their best zombie attire. My costume consisted of a brain cap (to wear over my bald head), hospital gown, some blood splatter, and I carried around my victim (Zombie Baby). I created my Zombie Baby for the Blogger Virtual Zombie Walk 2012  (please check it out). My husband was a nerd zombie that had a pencil sticking out of his head. My oldest daughter was Sam (yes we finished it) from the movie "Trick r' Treat." You can see all of the details about Sam HERE. And my youngest was Scooby Doo.  I had the absolute best time and will never miss another Zombie Walk.

Page 1
 
Check out a close up of the brain...I am so pleased with the way it turned out!!!


Page 2
 
 
And all together

I used these items to create my layout:
  • Design Studio
  • Happy Hauntings Cricut cartridge - "Zombie Walk 2012" title, the graves and grass
  • October 31st Cricut cartridge - the hand in the title
  • George and Basic Shapes Cricut cartridge - moon
  • Paper Doll Dress Up Cricut cartridge - city
  • A Frightful Affair Cricut cartridge - the zombies and hands
  • Mini Monsters Cricut cartridge - lamp post
  • Martha Stewart Dripping Goo edge punch - blood dripping
  • Glossy Accent - on blood and shoes of business attire zombie
  • star brads
  • plastic folder divider - glass part of the lamp post
  • eyelets - lamp post sign
  • ribbon - lamp post sign
  • brown, black and white ink
  • red craft paint - on blood splattered zombie and brain
  • Brain - created by Creepy Glowbugg - I just altered it a little by adding some watered down red craft paint (it was originally gray) and glossy accent to really make it shine!
I am entering my layout in the following challenges:
I am so happy that you've taken the time to check out my Zombie Walk 2012 layout, I hope you liked it. This year I hope to be able to spend more time scrapbooking and putting together the memories that have been created over the years, especially with my girls!

Friday, October 7, 2011

For All You Zombie Fans...you'll get a kick out of this!

Over at Buy Costumes.com they had this under the Zombie costumes...I thought it was too funny and had to share.

Zombie Costumes

In the event of a zombie apocalypse, BuyCostumes.com has provided you with a comprehensive survival guide to keep you from being left 4 dead…or undead, if you will.
Whether you’ve encountered an old-fashioned voodoo-gone-wild zombie, or a modern virus-infused zombie, one thing is for certain: You want to turn Mr. Tall, Dark and Living Dead into Mr. For real, No questions about it, dead-dead. The only way to do this is to destroy its brain. Machete or machine gun, you’ll find that everyone puts their own swagger on the zombie-killing business.
The crazies come in all shapes and sizes. First you have your slow, shambling types (“Easy Kills”, as we like to call them). Comprised mostly of those aforementioned voodoo zombies, the majority of their effectiveness comes from the shock-and-awe factor. They don’t move much faster than molasses in Wisconsin winter, but they can frighten people into submission. But not you. With the help of BuyCostumes.com, you’re a zombie-hunting machine!
Next up are the rabid virus zombies. These reanimated corpses are fast and dangerous! There’s no shuffling along Main Street for these guys. They stalk their prey, have super-charged cardiovascular systems (you better limber up!), and always seem to pop out of nowhere when the plot is running a little thin. Definitely not a novice zombie kill, you may have to settle for a shot-out knee cap in order to make your escape.
The good news is that for now, we’re safe. Present-day zombies are generally cubicle-bound and pose no threat outside of meaningless post-it note office pranks. But for those brave souls that dare to laugh in the face of the seemingly inevitable Z-DAY, you’ve come to the right place. An almost endless selection of zombie costumes and accessories, for both kids and adults, is not more than a click away! BuyCostumes.com hosts a thrilling inventory of zombie costumes for events like zombie pub crawls, zombie walks and even the spontaneous, decaying-in-action Zombie Flash Mob!
Are you a bit more unique than your tattered counterparts? There is a zombie costume for everyone! Grab a Mohawk wig, some studded accessories and Voila! London’s calling the punk rock zombie. Something old, something decayed, something dead, something frayed – zombie brides always get their groom of gloom. Want an excuse to wield a knife? Lab coats, stethoscopes and surgical masks – BuyCostumes.com has just what the Zombie doctor ordered!
Don’t let your night of the living dead become a thriller! BuyCostumes.com has zombie costumes and accessories to help you blend in. The zombies are coming. Are you prepared?

Wednesday, September 21, 2011

Things That Go Bump in the Night

I just had to create this card when I saw what the challenge was over at Cardz TV for challenge #91.  I already knew in my mind it had to be zombie related because I love zombies and they scare the heck out of me.  The other part of this card was very important to me because I wanted the hand to come out of the ground.  Then I remembered I saw back in one of my magazines a gift bag someone had made that did exactly what I wanted my hand to do.  This is my attempt at what that person created.

I used these items to create this card:
  • Design Studio 
  • Life's a Party Cricut cartridge for the tombstome
  • Happy Hauntings Cricut cartridge for the ghost, the hand, the name "Willy Rot"
  • Paper Doll Dress Up Cricut cartridge for the dirty mound
  • stickles
  • brad
  • Color Box ink
  • stencil brush
  • white gel pen
  • pop-dots
  • black pen
  • foam squares
  • misc. Halloween stamps
  • straw
  • floss

I am also entering this card in Paper Cutz Challenge #109 titled "Caution - Ghost Crossing!"  The requirements were to make a card, LO or craft project for Halloween using a Cricut cut, hand stamped or digital stamped ghosts, and the colors black, white, purple and orange ONLY!
I am also going to enter it in Lia Stamp Challenge #3 - move around which required the project to have a moving element and hopefully I achieved that here!!!  When you pull up on the ghost the hand rises from the grave...creeeeepy!!!
I am also entering this card in Getting Cricky - Simply Sunday Challenge which is anything Halloween!

I'm so excited this project was so much fun and it turned exactly the way I planned it...I hope you like it as much as I do!

****This was an article in Paper Crafts October 2008 and is where I got my inspiration from...I hope this is helpful to those of you who want to try this project.  I made my own alterations to achieve my card but by no means is it perfect.**** 

***If you click on the image you should be able to zoom in if your having trouble reading the article***