Showing posts with label Winter Woodland. Show all posts

Thursday, February 27, 2014

Get Your Glow On Invitations


My oldest daughter is turning 12 next month and she wanted a Glow-in-the-Dark/Sleepover party so I created these GET YOUR GLOW ON invitations.

I used these items to create my invitations:
  • Color Bok Day Glo cardstock
  • black and white cardstock
  • Design Studio
  • Winter Woodland Cricut cartridge - square
  • Hannah Montana Cricut cartridge - font 
  • Computer generated font - inside


I am entering my invitations in the following challenges and linky parties:
Thanks for visiting my blog and I hope you enjoyed my GET YOUR GLOW ON invitations.

Wednesday, January 29, 2014

Baby It's Cold Outside layout


I can't tell you how long I have wanted to create this layout. My oldest will be 12 this March and the photo in this layout was taken 11 years ago this month. My baby girl is growing up and I have alot of scrapbook pages waiting to be created but not this one anymore.

I decided to do this layout because right now there seems to be quite a few challenges that are about the outdoors/Winter. So I went searching for this photo...thank God it didn't take all day, I only had to go through about 3 albums to find it. Then the hard part, deciding what papers to use. I used 3 pattern papers all from a DCWV Christmas Stack paper pack (I believe from 2012). Then I had to decide on a title (Baby It's Cold Outside) and that came from the Winter Frolic Cricut cartridge. I also knew that I wanted a very large snowflake and I decided to use the one from Winter Woodland Cricut cartridge because it best resembles the ones on the pattern paper and the ribbon. Then the time came for the journaling. I wanted to keep it simple and to the point. It was Kaitlyn's 1st Snowfall (because we were on vacation from Arizona). I had the date stamped on the photo when it was taken so I knew the date was January 16, 2003. The journaling says, "We took Kaitlyn outside, to the patio of her Grandparent's house in NJ, and a snowflake landed on her cheek and she gasped as she experienced the icy cold crystal."  I originally had handwritten the journaling but I didn't like my handwriting so I used the computer and printed it out on cardstock. Lastly, was to just put it all together and add the embellishments, all of which are from my stash (nothing new).

Here are just some close ups:

Check out the chunky glitter on the snowflake

The title is glistening with Stickles

I also added Stickles to the Brrr! and snowflake

The journaling


I am entering this layout in the following Linky Parties and challenges:


I am so happy with the way this layout turned out and I know my daughter will love it as much as I do.

Friday, December 7, 2012

Countdown to Christmas Cookie Tray


Today I bring to you my Countdown to Christmas Cookie Tray!  I was inspired to do this project when I saw something similar on scrapbook.com.  This was such a fun project to do. 
 
I used these items to make this project:
  • 9 x 13 Cookie tray from The Dollar Store
  • Design Studio
  • Jolly Hollidays Cricut Lite Cartridge for the house and Santa
  • Winter Woodland Cricut Cartridge for the snowman
  • Everyday Paper Dolls for the snow drifts
  • Designer's Calendar for the numbers
  • clear yellow folder divder for the windows
  • red Stickles for the reindeer's nose
  • Glossy Accents for Santa's belt and boots
  • Iridescent Glitter on the snow
  • Double stick foam tape and magnet on the back of Santa
  • Ribbon so it can be hung


I will be entering my Countdown to Christmas Cookie Tray in the following challenges:
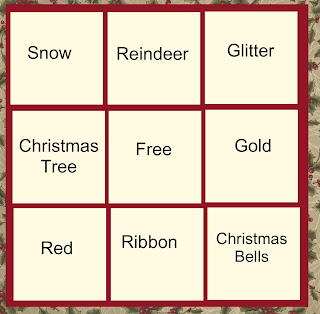
I choose snow, reindeer and glitter! - open til 12/9
Thank you so much for stopping by and checking out my Countdown to Christmas Cookie Tray.

Saturday, April 7, 2012

Easter Fence Basket

This was such a fun project to make.  I wanted to create a little Easter scene and found this perfect fence box on on the Wrap it Up Cricut cartridge and this is what I made. 
I used these items to make this Easter fence basket:
  • Design Studio
  • Wrap it Up Cricut cartridge - for the fence box and grass
  • Doodlecharms Cricut cartridge - for the eggs
  • Winter Woodland Cricut cartridge - for the bunny
  • Flower brads - to attach the strip of cardstock to create the handle of the basket
  • Recollections flock - for the bunny
  • google eyes -  for the bunny
  • Pink Sharpie marker - for the bunny nose
  • Martha Stewart glitter - for the eggs
  • brown ink - to dirty-up the fence
I just added the stuffed bunny and eggs for display purposes.  I plan on giving this to my mom with some Easter candy in it.  I also thought this stuffed Easter froggie I got her would fit in it, but no he was too big.
Here are some other views of each side and an angel view to see 3D look created with the foam squares:


I am entering this Easter fence basket in the following challenges:
Thank you so much for stopping by and checking out my Easter Fence Basket.

Saturday, January 7, 2012

Winter Fun card

I am continuing exploring digital stamps and here is another project I created using a digital stamp from Dilly Beans...I just love them!  I also used a distressing technique that I love...I tore some white cardstock to create snowy hills that I also stickled to give it some sparkle.  This is also an easel card...so far my favorite type of card.

I used these items to create this card:
  • Dilly Beans Snow Family digital stamp
  • Marth Stewart punch - for the small snowflakes
  • Sharpie markers
  • Stickles and Studio G Glitter Glue - on the snowmen and the snow
  • Winter Woodland Cricut cartridge - for the "Winter Fun" and the snowflake
  • Martha Stewart glitter - for the "Winter Fun" and the snowflake
  • Pop Dots - to raise the "Winter Fun"
Here are some other views:


I am entering this card in the following challenges:
Thanks for looking and I hope you enjoyed my Winter Fun card!

Friday, January 6, 2012

Just a Little Thank You card

The other day while working on another project I was inspired to create this little thank you card.  The project I was working on wasn't turning out the way I wanted so I decided to trash it...I did though save some of the parts. 

I used these items to create this card:
  • white and blue cardstock
  • Winter Woodland Cricut cartridge
  • a piece of basket wrap recycled from a gift - showing through the snowflake
  • Martha Stewart punch set
  • Many Thanks stamp and misc. snowflake stamps - on inside
  • Snowflake die cuts and punches - on inside salvaged from project that wasn't woking out
  • Stickles - on the Many Thanks stamp
Here's another view and the inside:
 You can see in the above photo how the basket wrap is peaking through the snowflake cut.


 I am entering this Thank You card in the following challenges:
I just love these 2 colors together...I had so much fun creating this little thank you card.  I hope you enjoyed it too!

Thursday, January 5, 2012

Snowflake Tealight Luminary Table Decoration

Since I live in sunny Arizona, we don't see much of the white stuff.  After Christmas I like to decorate the house with things that remind me of Winter.  Today I share with you a very simple tealight luminary I made.

I used these items to make this project:
  • Design Studio
  • Winter Woodland Cricut cartridge - the card feature cut twice at 3 7/8
  • Frosted Lace Stickles - around the edges and the snowflake
  • Vellum
  • Martha Stewart punch - for the little blue snowflakes
  • Blue ribbon
Here's a couple more pics to show the details, including how it looks lit up:


 My original idea for this project was much different than the final project but I am totally happy with the way it turned out.

I am entering this project in the following challenges:
I had so much fun creating this little tealight luminary...I KNOW I will be making more in the future!

Thanks for stopping by, please leave me a comment to let me know what you think...all comments are much appreciated!!!

Thursday, December 29, 2011

There's No Time Like SNOW Time!

I created this card originally for a challenge but by the time I got to link it it was already closed :(  Oh well, I am though very happy with the way it turned out.  The challenge required you to make a card using a snowman and it had to include a border, something metal, and be monochromatic.  No matter, because a couple of new challenges are available:
I used these items to create this card:
  • Design Studio
  • Winter Woodland Cricut cartridge - for the snowman
  • Martha Stewart punch set
  • Cuttlebug
  • D'vine Swirls embossing folder
  • white sheer ribbon
  • iridescent snowflake - on the ribbon
  • snowflake brad - on the snowman
  • Studio G iridescent glitter glue
  • frosted lace Stickles
  • (inside) - stamp from BugBites - All Year Round stamps


I'm not sure if you can see it but I used the iridescent glitter glue on the hat and scarf of the snowman and the frosted lace Stickles just around his body and eyes.


Well, I hope you enjoyed my little simple card and I look forward to sharing more projects in the future.