Showing posts with label Happy Hauntings. Show all posts

Monday, October 27, 2014

31 Days of Halloween Activities Calendar/Countdown to Halloween Day 27


So I have been working on this project pretty much the last 3 weeks, I guess I should have started it last month. Oh well, I guess we will get the full effect next year.
 
Below is a photo of what this started as, just a simple wooden country calendar. I only wanted to use the base, so I removed the top and bottom portions and tossed out the middle wooden piece too.

 
Once all of the pieces were gone I spray painted it all black.
 
 
I then began cutting and putting together all of the paper pieces.
 
 
I used these items to create my 31 Days of Halloween Activities Calendar:
  • Up-cycled very old (was lost in my garage) wooden country calendar
  • Phrases Cricut cartridge - the Happy Halloween at the top
  • Happy Hauntings Cricut cartridge - the house and ghosts
  • Monster Bash Cricut cartridge (1st time used) - the tree and moon
  • Life's a Party Cricut cartridge - the tombstones
  • Designer's Calendar - numbers
  • Orange eyelets
  • Computer - printed out Halloween activities for the back of the tombstones
  • Nails - to hang the tombstones on
  • Black Ribbon - to hang up the calendar


Here is a pic showing some of the tombstones revealing the activity for the day.


I am entering my 31 Days of Halloween Activities Calendar in the following challenges:
Thank you so much for stopping by and checking out my 31 Days of Halloween Activities Calendar.

Friday, January 18, 2013

Zombie Walk 2012 Layout


I am super excited to share with you today my 2 page Zombie Walk 2012 layout. I've been wanting to create this layout ever since the Zombie Walk in October.

This was the 1st year we were able to participate and I wasn't gonna let anything get in my way. The week before I had received my 2nd round of chemo to treat my breast cancer. When I had my labs drawn the next week, the week of the Zombie Walk, it was determined I was neutropenic. Which basically means all of my blood counts were extremely low or zero and that made me very susceptible to infection. So I was ordered to receive neupogen shots over the next 5 days, the last day being the night of the Zombie Walk. Plus, the doctor did want me to get a blood transfusion but I refused for personally reasons.

So the day of the Zombie Walk my husband and I were frantically trying to finish my daughter's Sam costume and I was taking my daughters across town to The Railroad Park to attend the NICU Halloween event for preemie graduates, which my youngest daughter is.  We had a really nice time. I ran into a co-worker and the family that my daughter shared a room with in the NICU. The girls got their faces painted, road the merry-go-round and the train.  Then it was rush, rush, rush home, drop the kids off and then get my last neupogen shot. Plus during all of this I was trying to find a hospital gown to wear to the Zombie Walk.  Thankfully for my nurse at the hospital, she gave me one!  Then it was a rush to get home again, still trying to finish my daughter's Sam costume and get myself and youngest daughter ready for the Zombie Walk.

We ended up just a little late and missed the beginning of the walk but joined right in. I finally felt like I belonged somewhere. Everyone was dressed in their best zombie attire. My costume consisted of a brain cap (to wear over my bald head), hospital gown, some blood splatter, and I carried around my victim (Zombie Baby). I created my Zombie Baby for the Blogger Virtual Zombie Walk 2012  (please check it out). My husband was a nerd zombie that had a pencil sticking out of his head. My oldest daughter was Sam (yes we finished it) from the movie "Trick r' Treat." You can see all of the details about Sam HERE. And my youngest was Scooby Doo.  I had the absolute best time and will never miss another Zombie Walk.

Page 1
 
Check out a close up of the brain...I am so pleased with the way it turned out!!!


Page 2
 
 
And all together

I used these items to create my layout:
  • Design Studio
  • Happy Hauntings Cricut cartridge - "Zombie Walk 2012" title, the graves and grass
  • October 31st Cricut cartridge - the hand in the title
  • George and Basic Shapes Cricut cartridge - moon
  • Paper Doll Dress Up Cricut cartridge - city
  • A Frightful Affair Cricut cartridge - the zombies and hands
  • Mini Monsters Cricut cartridge - lamp post
  • Martha Stewart Dripping Goo edge punch - blood dripping
  • Glossy Accent - on blood and shoes of business attire zombie
  • star brads
  • plastic folder divider - glass part of the lamp post
  • eyelets - lamp post sign
  • ribbon - lamp post sign
  • brown, black and white ink
  • red craft paint - on blood splattered zombie and brain
  • Brain - created by Creepy Glowbugg - I just altered it a little by adding some watered down red craft paint (it was originally gray) and glossy accent to really make it shine!
I am entering my layout in the following challenges:
I am so happy that you've taken the time to check out my Zombie Walk 2012 layout, I hope you liked it. This year I hope to be able to spend more time scrapbooking and putting together the memories that have been created over the years, especially with my girls!

Thursday, September 20, 2012

Im Melting


Today I bring to a card I had to make twice...unfortunately while my 1st one was drying with the glossy accent my mom placed something on of it not realizing it was even there...it was ruined!  I freaked out needless to say.  So this is my 2nd card. 

I was inspired to create this card based on the challenge over at Haunted Design House - Macabre Monday - HDH #151 - I'm Melting.  I, of course, had to turn to my favorite witch of all time from my favorite movie of all time...The Wicked Witch of the East from The Wizard of Oz.


I used these items to create this card:
  • The Wizard of Oz Paper Pad
  • Black cardstock
  • Martha Stewart goo edge Punch
  • Happy Hauntings Cricut cartridge - Font
  • Glossy Accent - on the goo, the font and the bottom of the witch
  • Misc. clear Halloween stamp
I am entering this card in the following challenges:
Thank you so much for stopping by and checking out my I'm Melting card.

Monday, September 10, 2012

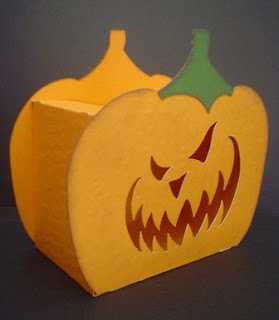
Scary Pumpkin Treat Box and Luminary


Today I bring to you a 2 in 1 - Pumpkin Treat Box and Luminary.
 
Here you can see it as a treat box and a pretty good size treat box too, 4 1/2 wide x 4 1/4 high.

 
 Filled with lots of yummy chocolate treats!


Here is a view of the back.


The sides.


I'm not sure if you can see it in the photos but I did give the pumpkin some texture and it really looks very similar to the real thing.
 
 
And now what this treat box looks like as a luminary...scary!!!!
 
 
I used these items to create my Pumpkin Treat Box and Luminary:
  • Design Studio
  • Happy Hauntings Cricut cartridge - pumpkin
  • October 31st Cricut cartridge - face of the pumpkin - Using the Design Studio I hid the outer contours and just used the face and placed inside the pumpkin (so it would be cut out of the pumpkin)
  • Fiskars Texture Plate (carpet) - on the pumpkin
  • brown ink - on the edges
  • Michael's $1.00 Wooden stamp - on the back
I am entering this Pumpkin Treat Box and Luminary in the following challenges:
 

Wednesday, September 5, 2012

Spooky Halloween Tag


Today I bring to you a Spooky Halloween Tag.  I don't know exactly what I am going to use this for, I don't ususally give gifts for Halloween...maybe I will this year though.  I had a blast making it and that is all that matters.

Here is a look at what this tag looks like on a bottle of wine and a close up of her bow:


I used these items to create this Halloween tag:
I am entering this tag in the following challenges:
Thank you for stopping by and checking out my Spooky Halloween Tag.

Thursday, August 30, 2012

Beware the Blood Moon card


I have been thinking about this project ever since I saw the challenge post for Macabre Monday over at Haunted Design House .  I new right off the bat I wanted to create a blood moon, inspired by the movie Red Riding Hood.  I also remembered I had great stack of paper from DCWV called The Immortal Love Stack and I knew it had a fabulous paper in it with a wolf face.  So that is how it started.


I used these items to create this card:
  • Design Studio
  • George and Basic Shapes Cricut cartridge - the moon "window"
  • Happy Hauntings Cricut cartridge - BEWARE
  • Crackle Accents - on the BEWARE
  • Glossy Accents - on the BEWARE, the moon and the wolf eyes (inside)
  • Craft paint - clouds
  • red plastic folder divider - the moon
  • DCWV The Immortal Love Stack - the wolf face paper inside the card
  • computer font - "Under the Blood Moon...a man bitten is a man cursed." Red Riding Hood
  • brown ink - inked the edges of the inside font papers
I am entering this card in the following challenges:
Thank you so much for stopping by and checking out my Beware the Blood Moon card.

Sunday, July 22, 2012

Haunted Window


I can't believe it I designed, cut, and completed a card in just a couple of hours (and that's with taking care of a 2 year old and making dinner, too)!  I have here for you my Haunted Window card.

I used these items to create this card:
  • Design Studio 
  • October 31st Seasonal Cricut cartridge - the window
  • Happy Hauntings Cricut cartridge - the ghosts
  • clear craft plastic - the window
  • misc. pattern paper (that I've had for who knows how long) - outside and inside card
  • stone ghost sign sticker * my favorite hoarded item *(another piece that I've had for who knows how long)
  • brad - to hold on the stone ghost sign sticker
  • misc. clear BOO stamp - on the inside
  • misc. clear Happy Hauntings stamp - on the inside
Here's the inside:


I am entering this card in the following challenges:
Thank you so much for stopping y and checking out my Haunted Window card.

Thursday, July 19, 2012

Music Mayhem HDH 142 - He's Back (The Man Behind the Mask)


This week over at Haunted Design House Macabre Monday the challenge is to create a dark, Gothic, or Halloween-based art piece that uses a song or song title as your muse.  I did some research on the internet and found a song that totally inspired my creation.  I can't believe I had never heard this song, Alice Cooper's "He's Back (The Man Behind the Mask)."  I have always been a HUGE fan of The Friday the 13th films and Jason Voorhees is one of my all-time favorite slasher film killers!  That is why I was so surprised I had never heard this song, plus who doesn't love Alice Cooper!!!  If you are interested in listening to and watching the video you can check it out HERE on YouTube!

I used these items to create this card:
  • the mask image is from the internet
  • the machete is from the internet too but I didn't like the way it looked printed so I hand cut out and painted my own and applied a little Glossy Accents to the paint and handles
  • the background paper (inside and out) are from DCWV The Immortal Love stack
  • Martha Stewart edge punch
  • Design Studio
  • Happy Hauntings Cricut cartridge - Friday the 13th
  • Pooh Font Cricut cartridge - HE'S BACK!
  • (inside card) Studio G clear stamp - TREAD LIGHTLY - which I cut out and made to look like a camp sign
  • (inside card) white gel pen - for the letters of the sign
Here is the inside of the card:


Here is a close up of "the mask..." so that you can see some of the blood on the machetes:

I am entering this card in the following challenges:
I am so pleased with the way this card turned out...I think even Jason would be proud.  Thank you so much for stopping by and checking out my He's Back (The Man Behind the Mask) card.

Sunday, May 6, 2012

Altered Jewelry Box - HDH131 Macabre Monday - CASE a Minion


So this week at Haunted Design House the challenge was to CASE a Minion.  Basically you are to create a dark, Gothic, or Halloween-based art piece that has been CASEd from one the Minion's DT offerings.  CASE = Copy And Steal Everything.  I chose to CASE Sultana of the Sinister Lynx aka Black Dragon, you can find her project that I CASEd HERE!!!  I fell in love with her jewelry box and I just knew I could at least attempt to create something similar.  Plus, this jewerly box will give my Halloween jewelry a new resting place until October every year from now on.


I already knew I had the cardstock I wanted to use.  The cardstock I used was in a Halloween pack from Recollections.  I picked up a very inexpensive wooden box from Michael's.  I painted the entire box with black craft paint.  Covered most of the box with the cardstock.  I sanded the edges down just a bit.  I applied a glossy Mod Podge over the entire surface of the box and let that dry overnight.  I then hot glued some really interesting black ribbon around the box.  I cut 16 little flowers out with my Cuttlebug.  I put 8 of those flowers together with a brad and began to shape the flower.  I created 2 flowers this way.  I also added a small black pompom to the center of the flower.  I then lightly brushed some silver glitter paint onto the edges.  I cut 3 leaves out with my Cuttlebug.  I added some Crackle Accents to the leaves but they didn't create the effect I wanted (I don't think the Crackle Accents liked the silver cardstock).  I cut out on my Cricut the scull from Happy Hauntings at 4 inches.  One was cut in the silver cardstock and the other in black, I hid the contours on that one to create a black out scull.  I attached the two together and then added Glossy Accents to give it some dimension.  Once I had all the pieces dry, I hot glued everything to the jewelry box along with some other embellishments...the spider was just something I had to add (maybe he'll keep some little hands out of my jewelry).


I am entering this Altered Jewelry Box in the following challenges:
Thank you so much for stopping by and checking out my Altered Jewelry Box!!!

Sunday, April 29, 2012

Jeepers Creepers easel card


Today I bring to you a very, very early Halloween card.  Halloween has always been my favorite holiday and I have no problems creating projects early for it.  My inspiration came from the challenge over at Haunted Design House - Macabre Monday  The challenge is HDH130 "Eye Can See You."  You are to create a dark, Gothic, or Halloween-based art piece that is to use eyeballs or optical themed images.

I started looking through some old craft magazines and noticed someone had used the title "Jeepers Creepers" and WHAM...I have it, the idea for my card.  I decided to use the lyric from song and this is what I came up with.


I used these items to create this card:
  • Design Studio
  • Computer generated font - for the "Jeepers Creepers where'd ya get those...Peepers"
  • Doodlecharms Cricut Cartridge - for the jar
  • Happy Hauntings Cricut Cartridge - for the "Happy Halloween"
  • Martha Stewart edge punch - for the slim
  • Google eyes
  • Glossy Accents - for the slim in and out of the jar and the "Happy Halloween"
  • Misc. stickers


I am entering this card in the following challenges:
Thank you so much for checking out my Jeepers Creepers card!

Sunday, October 23, 2011

Froggy Witch Halloween Easel card

Hey there fellow crafters I have a card I am sharing with you today that I created for my mom for Halloween.  My mom loves frogs...in fact in her backyard, by her pool she has frog land.  You'll find all types of frogs there, all except for real ones.  I knew right away what froggy I wanted to use and of course it would have to come from one of my favorite cartridges *Creat-a-Critter*


I am entering this card in these challenge:

I used these items to create this card:
  • Design Studio
  • Cricut cartridge Creat-a-Critter - for the frog
  • Cricut cartridge Happy Hauntings - for the hat
  • Martha Stewart punch - for the inside of the card
  • google eyes
  • Cuttlebug
  • green and purple stickles - the hat and frog
  • misc. stickers - for the inside of the card
  • My Moments peel n stick ribbon
  • open stock pattern paper from Hobby Lobby
Here's an up close view of the froggy's hat.  I show you this because my 9 year old daughter suggested I emboss the hat to make it look like the hat on the paper and this is how it turned out.  I think she had an excellent idea and it works perfectly.


Here's an up close view of the inside:

Thanks for looking and I hope you enjoyed my Froggy Witch Halloween Easel card!