Showing posts with label Fiskars Texture Plate. Show all posts

Monday, January 9, 2017

Fantabulous Cricut Challenge #292 - Something New

 I AM BACK!!!

It feels so good to be back creating again. I'm also so happy to be back designing again for Fantabulous Cricut.Challenge Blog. So let's get going.


Challenge #292-Something New
Make a project using a new technique, cartridge, embellishment, etc.

This Weeks Sponsor


To qualify for the prize, be sure to use at least 1 Cricut cut on your project and if it's not obvious, let us know what cartridge you used. If you use a Cricut Explore machine, at least one cut must be from the Cricut catalog of images.

Any project that doesn't use a Cricut element will be deleted.

Here is what I have created for this challenge:
 
 
So if you don't know already from my previous blog post, I was unable to create or blog for over a year. During that time I became a caregiver to my elderly mother. She passed away in early November and I'm still trying to pick up the pieces. I had very little help but for those who have helped me I thought I'd create a little thank you card to show my appreciation.
 
My inspiration for this card was my Mom's kitchen window and 1 of her cats. She had 5 cats, 3 dogs and 3 fish at the time of her passing and I took them all in. So I now have 11 cats, 6 dogs, 3 fish and a bearded dragon. I feel the image of the black cat gazing out the window into the sky was a reflection of how I, and my mom's beloved pets, feel looking to find her in the heavens.
 
I used these items to create my card:
  • Spring Cottage Cricut cartridge *my Something New* - window cut at 4 1/2
  • A Child's Year Cricut cartridge - cat cut at 2
  • ZooBalloo Cricut cartridge *my Something Old* - clouds cut at 1 3/4
  • Fiskers texture plate (carpet) - texture on the "wall"
  • Cardstock: white, kraft, black, sky blue
  • Card dimensions 6 x 4 1/2
 
 I am entering my card in the following challenges:
Thank you so much for stopping by and checking out my card today. I hope you join in on the fun over at Fantabulous Cricut Challenge.
post signature

Monday, May 25, 2015

Fantabulous Cricut Challenge #252 - Follow the Sketch

 Happy Monday and welcome to another Monday challenge!


Challenge #252-Follow the Sketch

This Weeks Sponsor


Bugaboo Stamps


The prize is 7 digital stamps!

Create a project inspired by the sketch below-

For inspiration see:  http://retrosketches.blogspot.ca/2012/07/retrosketches-22.html

To qualify for the prize, be sure to use at least 1 Cricut cut on your project and if it's not obvious, let us know what cartridge you used. If you use a Cricut Explore machine, at least one cut must be from the Cricut catalog of images.
 
This is my 1st post as a Design Team Member for the Fantabulous Cricut Challenge Blog.
I am super excited to share with you my creation using the provided sketch.
 
 
I used the provided sketch to create a birthday card for my best friend. She recently adopted a couple of Chihuahuas. I personally have 2 Chihuahuas myself and even talked my mom into adopting a Chihuahua last year. So my best friends Chihuahuas all have the same black and tan coloring so I designed this little Chihuahua to look like the ones she has. I know she will love this card when I send it out to her for her birthday.
 
I made a modification to the Chihuahua cut from the Cricut Lite cartridge Four Legged Friends...I cut off the heart and replaced it with a party blow-out from the Celebrations Cricut cartridge and added a party hat from the same cartridge. I also used black brads for the eyes instead of the ones from the cut. I then cut out the tag from the Cricut Lite cartridge Four Legged Friends and stamped it with "Party Animal" from the CardzTV clear stamps set "Good Times." Lastly, I applied red glitter glue from Studio G to the tag, hat and collar.


So before assembling the card I decided to emboss the Kraft cardstock with Fiskars texture plate PAWS and I just love the way it looks. I finished it off with a paw clear stamp (I believe from Studio G) going up the edge. Then I just assembled the card like the sketch but I did put some foam mounts from Stampin' Up behind the tag and the Chihuahua.
 

The inside of the card I kept very simple. I added a strip of the same dog bone paper from the front to the inside and stamped it with "Happy Birthday to You!" also from the CardzTV clear stamps set "Good Times."


I used these items to create my card:
  • Cricut Lite cartridge Four Legged Friends - Chihuahua and tag
  • Celebrations Cricut cartridge - party hat and party blow-out
  • Elegant Edges Cricut cartridge - Kraft cardstock
  • Fiskars texture plate PAWS - Kraft cardstock
  • paw clear stamp - Kraft cardstock
  • black eyelet - tag
  • black brads - eyes
  • CardzTV clear stamps set "Good Times." - outside and inside sentiments
  • Studio G red glitter glue - on tag, party hat and party blow-out
  • Stampin' Up foam mounts from - behind tag and Chihuahua
 I am entering my Party Animal card in the following challenges:
 
Thank you so much for stopping by and checking out my 1st creation as a Fantabulous Cricut Challenge Blog Design Team Member. Make sure to check out their challenge and enter your own creation. 


Saturday, August 16, 2014

Smile, Swing on over to Celebrate Jaidyn's 3rd Birthday Shrek 2 Party 2 page layout


Today I bring to you my Smile, Swing on over to Celebrate Jaidyn's 3rd Birthday Shrek 2 Party 2 page layout. This didn't start out as a 2 page layout but here it is and I think it works.

Page 1 is "Smile" because this page describes the photos I took of Jaidyn for her invitation. I actually did some hidden journaling behind the camera. Basically I made the camera into a shape card...pretty cool I think!


The journaling says, "It was October 30, 2012 and I had to get a good photo of Jaidyn for her 3rd birthday party invitation. So we went out front, with her favorite green shirt on, and I attempted to get a good photo. But Jaidyn would look everywhere but at me. The best one I got is the one in the frame. This is also the one I had put on her invitation. Not the greatest picture but definitely shows Jaidyn's personality." 

I also used an "old school" tool on the wooden frame. I used a texture plate called carpet to make the wooden frame look like tree bark instead of using the easy to use embossing folders.

I used these items to make "Smile" page 1:
  • Shrek napkin and treat bag from the birthday party
  • Pooh and Friends Cricut cartridge (1st time I used this cartridge) - for the frame
  • Dreams Come True Disney Cricut cartridge - slime splat
  • Create a Critter Cricut cartridge - camera
  • Phrases Cricut cartridge (1st time I used this cartridge) - "smile"
  • Brown, green, black and silver cardstock
  • Fiskars texture plate (carpet) (1st time I used this plate)- on the frame
  • Brown ink and marker - on the frame
  • Brads - on the frame
  • Glossy Accents - on the slime splat and camera lens
  • Foam squares - under the slime splat and camera
Page 2 is the Swing on over to Celebrate Jaidyn's 3rd Birthday invitation page , it displays the invitation I had made with one of the photos I took on page 1. One other cool thing I did was I used items from Jaidyn's party to create both pages. I used one of the napkins for the main images and a treat bag with Shrek on it. These were such fun pages to make...I really glad I kept those party items.


I used the items to make the Swing on over to Celebrate Jaidyn's 3rd Birthday Shrek 2 Party page 2:
  • Shrek napkin
  • Christmas Cheer Cricut cartridge - trees
  • 2 different colors of green and teal cardstock
  • Brown ink - on the trees
  • PARTY metal tag 
  • The actual invitation from Jaidyn's party

I am entering my Smile, Swing on over to Celebrate Jaidyn's 3rd Birthday Shrek 2 Party 2 page layout in the following challenges and linky parties:
Thank you so much for stopping by and checking out my Smile, Swing on over to Celebrate Jaidyn's 3rd Birthday Shrek 2 Party 2 page layout.

Sunday, October 7, 2012

The Jersey Devil


When I saw the challenge over at Haunted Design House - HDH #153 - Creepy Cryptids I knew right away what I wanted to do...The Jersey Devil!  Being a former Jersey Girl myself I know all too well about the Jersey Devil.

Legend has it that in 1735, a Pines resident known as Mother Leeds found herself pregnant for the thirteenth time. (Leeds is the name of one of New Jersey’s earliest settlers, and many descendants of the Leeds family can still be found throughout NJ to this day.) Mother Leeds was not living a wealthy lifestyle by any means. Her husband was a drunkard who made few efforts to provide for his wife and twelve children. Reaching the point of absolute exasperation upon learning of her thirteenth child, she raised her hands to the heavens and proclaimed “Let this one be a devil!”
Mother Leeds went into labor a few months later, on a tumultuously stormy night, no longer mindful of the curse she had utter previously regarding her unborn child. Her children and husband huddled together in one room of their Leeds Point home while local midwives gathered to deliver the baby in another. By all accounts the birth went routinely, and the thirteenth Leeds child was a seemingly normal baby boy.

Within minutes however, Mother Leeds’s unholy wish of months before began to come to fruition. The baby started to change, and metamorphosed right before her very eyes. Within moments it transformed from a beautiful newborn baby into a hideous creature unlike anything the world had ever seen. The wailing infant began growing at an incredible rate. It sprouted horns from the top of its head and talon-like claws tore through the tips of its fingers. Leathery bat-like wings unfurled from its back, and hair and feathers sprouted all over the child’s body. Its eyes began glowing bright red as they grew larger in the monster’s gnarled and snarling face. The creature savagely attacked its own mother, killing her, then turned its attention to the rest of the horrified onlookers who witnessed its tempestuous transformation. It flew at them, clawing and biting, voicing unearthly shrieks the entire time. It tore the midwives limb from limb, maiming some and killing others.

You can read more about The Jersey Devil HERE

Here is a closer look at the title and the devil's wings, to show off the texture:


I used the following items to create this layout:
  • Design Studio - I welded the wings, the horse body, horns, tail, and claws to the wings
  • Wrap It Up Cricut cartridge - wings
  • Old West Cricut cartridge - horse
  • Animal Kingdom Cricut cartridge - horns and claws on the wings
  • Accent Essentials Cricut cartridge - tail
  • DCWV The Immortal Love Stack - background paper
  • Fiskers Texture plate (leather) - on the wings
  • Black Sharpie Marker - wings, mane, claws, claws on the wongs, tail, hooves and horns
  • black ink - title
  • Glossy Accents - title, claws, claws on the wings, and hooves
  • foam squares - behind the title
  • Pop-up glue spots - behind the devil

I am entering this layout about The Jersey Devil in the following challenges:
Thank you so much for stopping by and checking out my Jersey Devil layout.

Monday, September 10, 2012

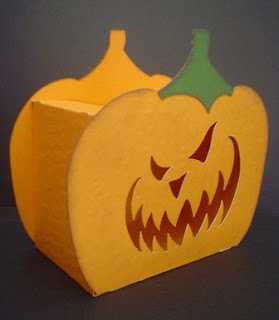
Scary Pumpkin Treat Box and Luminary


Today I bring to you a 2 in 1 - Pumpkin Treat Box and Luminary.
 
Here you can see it as a treat box and a pretty good size treat box too, 4 1/2 wide x 4 1/4 high.

 
 Filled with lots of yummy chocolate treats!


Here is a view of the back.


The sides.


I'm not sure if you can see it in the photos but I did give the pumpkin some texture and it really looks very similar to the real thing.
 
 
And now what this treat box looks like as a luminary...scary!!!!
 
 
I used these items to create my Pumpkin Treat Box and Luminary:
  • Design Studio
  • Happy Hauntings Cricut cartridge - pumpkin
  • October 31st Cricut cartridge - face of the pumpkin - Using the Design Studio I hid the outer contours and just used the face and placed inside the pumpkin (so it would be cut out of the pumpkin)
  • Fiskars Texture Plate (carpet) - on the pumpkin
  • brown ink - on the edges
  • Michael's $1.00 Wooden stamp - on the back
I am entering this Pumpkin Treat Box and Luminary in the following challenges: