Showing posts with label Locker Talk. Show all posts

Sunday, May 13, 2012

Looking through the Window - Mother's Day card


Today I bring to you a Mother's Day card I created for my mother-in-law.  During the end of December my mother-in-law had made this statement on her facebook page, "So strange!!! I was looking out my kitchen window this morning thinking about Joe (her deceased husband) when this yellow butterfly flew on my deck and hoovered in front of the window a little while then flew away...Maybe it was telling me that I will be okay and next year will be a better one for me!!!!! I hope so anyway...."  Now this might not sound strange to some of you but since she lives on the east coast, seeing a butterfly in December is very strange.  Ever since that day I knew I wanted to create a window card for her...and this is what I came up with.


I used these items to create this card:
  • Design Studio
  • Locker Talk Cricut cartridge - for the window card***I know totally not expected!!!
  • George and Basic Shapes Cricut cartridge - for the square cut for the window
  • Indie Art Cricut cartridge - the butterfly
  • Cuttlebug
  • Swiss Dots embossing folder
  • Studio G glitter glue
  • foam squares
  • Stampin' Up Ribbon and lace - for the curtain effect
  • Glue Gun - to attach the lace to the ribbon
  • Clear Craft Plastic - for the window
  •  DCWV Spring Stack of pattern paper
  • My Craft Spot stamps - Inside & Out Set #2

I am entering this card in the following challenges:
Thank you so much for stopping by and checking out my Looking Through the Window Mother's Day card!

Thursday, May 10, 2012

Altered Teacher Appreciation Reward Canister


I've had this small clear canister for months now and finally did something with it.  I created this reward canister for my daughter's 4th grade teacher as a part of his teacher appreciation gift.  I found this project to be extremely simple and will be making more of these in the future.


I used these items to create this teacher appreciation reward canister:
  • small clear canister from $1.00 bin at Target
  • DCWV Grade School printed cardstock
  • George and Basic Shapes Cricut cartridge - for the circle and star on lid
  • Locker Talk Cricut cartridge -  for the "Good Job!" saying on front
  • Red, green and yellow Stickles
  • Red ribbon
  • "You Rock" clear stamp from Bug Bites Stamps - All Year Round


I am entering this altered teacher reward canister in the following challenges:
Thank you so much for stopping by and checking out my Altered Teacher Appreciation Reward Canister!

Monday, May 7, 2012

Altered Clipboard for Teacher Appreciation


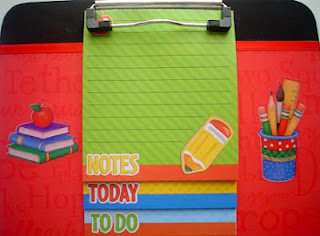
I can't believe I haven't done one of these sooner...it was so easy and very inexpensive!  My daughter's 4th grade teacher is a very nice man and has really done any amazing job with her this year.  Kaitlyn is a very good student but tends to get distracted from time-to-time (which is normal for 10).  Her teacher was always encouraging and positive.  Plus, this year Kaitlyn finally tested into the Gifted Program at ther school!

I got the clipboard and note pad from the Dollar Store.  I painted the entire clipboard with black craft paint.  I covered most of the front with a piece of cardstock from DCWV Grade School printed cardstock.  Then I added some stickers from Me and My Big Idea.  Lastly I attached some red ribbon to the top and clipped on the note pad.

I know most of the altered clipboards I have seen had tons of ribbon tied to the top...I didn't want to do that since I think ribbon is girly and her teacher is a man.

Here's a look at the back:


I attached a green piece of cardstock to the back.  I cut all the letters out from Plantin SchoolBook with the except of the "A+" which I cut from Locker Talk and the "thank you" came from Beyond Birthdays.  Once I attached them to the board I applied Glossy Accent to them.

I am entering this Altered Clipboard in the following challenges:
Thank you so much for stopping by and checking out my Altered Clipboard for Teacher Appreciation!

Friday, May 6, 2011

Teacher Appreciation Basket

I made this basket for my daughter's 3rd grade teacher for Teacher Appreciation Day.


I got the basket from Michael's for only $3.50, added some ribbon I already had, placed some craft foam in the bottom, covered it with some leftover Easter grass, put in some Granny Smith and Pink Lady apples, and last made the sticks.

I used these Cricut cartridges:
George and Basic Shapes for the star cut @ 3
Cricut Sampler for the Thanks cut @ 3
A Child's Year for the 2 apples cut @ 3
Doodlecharms for the watermelon cut @ 3
Locker Talk for the A+ cut @ 1 3/4
Graphically Speaking for the chalkboard cut @ 3 1/2
Celebrations for the banner cut @ 4
Wild Card for the #1 Teacher cut @ 6
Alphalicious for the You're the Best cut @ 2

Too many carts I know but I think the end product turned out pretty good.  I learned from doing this project that in the future to use less carts.  Using this many carts was very time consuming!


Here's the Basket and the card together!

Teacher Appreciation card

I created this easel card for my daughter's 3rd grade teacher for Teacher Appreciation Day.  It's a 5 1/2 x 5 1/2 easel card (my 1st attempt at this kind of card). 

I used these cartridges:
Graphically Speaking for the blackboard with the alphabet frame cut @ 3 3/4, I also used some sandpaper to give the black cardstock the look of a blackboard
Locker Talk for the A+ cut @ 1 3/4, I also used Martha Stewart glitter

I also applied some stickles to the dots on the pattern paper and attached some brads and ribbon


On the inside of the card I used this cartridge:
Jasmine for the Many Thanks phrase (I'm sorry but I can't remember what size I cut it at)

Friday, April 1, 2011

Zebra Purse card

I finally figured out my Cricut Design Studio and went WILD!!! I made this card for my niece who is turning 17 today! I made all of my cuts in the DS. I will be putting a gift card in it as her gift!

I used these Cricut cartridges:

Wild Card for purse cut twice (zebra print and black) at 6 1/4, welded and stretched to fit. I used the black parts for the handles, the inside of purse, and flap

Locker Talk for the key cut at 2 and the MP3 player

Designer Calendar for the cellphone

Paper Doll Dress Up for the lipstick cut at 2

George and Basic Shapes for the nail polish which I took 2 shapes and welded them together to create the shape

This was by far my funnest project and I finished in a day(of course with Mom duty in the middle).

I want to give a special thanks to Michelle Petersen (on the cricut.com mb) for the inspiration!

Here's a look at the inside of the purse and a little message.