Friday, December 21, 2012

Gingerbread Man Candy Cane Holder/Ornament


Today I bring to a little Gingerbread Man Candy Cane/Ornament. Originally I was making 28 of these for my daughter's 5th grade class but unfortunately she came down with strep throat 3 days before the last day of school before her winter break. I couldn't have them go to waste so I decided to only make 15 and hand them out to my fellow chemo patients and nurses when I went in for my chemo treatment this week. I'm not sure if you can see it in the photo but I did attach the candy cane just a little with my ATG. These were so much fun to make I hope to make more in the future.

Here is a peak at the back where I stamped it with the simple saying, "Merry Merry Merry Christmas."


I used these items to create this project:
I am entering this project in the following challenges:
Thank you so much for stopping by and checking out my little Gingerbread Man Candy Cane Holder/Ornament.

A Gift For You - Christmas Layout

 
Today I bring to you a very special scrapbook layout I made. In 2009 we had a very special early Christmas gift given to us, our youngest daughter Jaidyn. She was born premature at 31 weeks and 2 days weighing only 3 lbs. 1 oz. Jaidyn only spent 27 days in the NICU and we brought her home just 2 weeks before Christmas. This photo with Santa and her older sister Kaitlyn was taken 3 days before Christmas and I still can't believe how tiny Jaidyn was. She was the best early Christmas gift ever.

I used these items (all of which I've had for at least a year or longer) to create this layout:
  • Misc. pattern paper and cardstock
  • Winter Frolic Cricut cartridge - "A Gift For You"
  • Martha Stewart glitter
  • Martha Stewart edge punch - used leftover snowflake
  • ribbon
  • iridescent snowflakes
  • metal SANTA tag - attached to the hidden journaling
  • misc. clear Santa stamp

Behind the photo I did some hidden journaling and it says:

A Gift For You
That is what Jaidyn was for us November 17, 2009. My water broke on November 11th and Jaidyn was born via C-section 6 days later, 9 weeks before her due date. December 22, 2009 was Jaidyn’s 1st visit to see Santa at the mall.  Kaitlyn looked beautiful in her Christmas dress and Jaidyn just looked so tiny in her Santa jammies. Jaidyn slept through the entire time in line. Her monitor kept going off, which was nothing to worry about. We were so worried about having Jaidyn so early but she proved to be a tough little cookie. We just know she had other plans and wanted to be in our arms before Christmas. She was the best early Christmas gift anyone could ask for.

I am entering this layout in the following challenges:
Thank you so much for stopping by and checking out my layout!

Friday, December 7, 2012

Countdown to Christmas Cookie Tray


Today I bring to you my Countdown to Christmas Cookie Tray!  I was inspired to do this project when I saw something similar on scrapbook.com.  This was such a fun project to do. 
 
I used these items to make this project:
  • 9 x 13 Cookie tray from The Dollar Store
  • Design Studio
  • Jolly Hollidays Cricut Lite Cartridge for the house and Santa
  • Winter Woodland Cricut Cartridge for the snowman
  • Everyday Paper Dolls for the snow drifts
  • Designer's Calendar for the numbers
  • clear yellow folder divder for the windows
  • red Stickles for the reindeer's nose
  • Glossy Accents for Santa's belt and boots
  • Iridescent Glitter on the snow
  • Double stick foam tape and magnet on the back of Santa
  • Ribbon so it can be hung


I will be entering my Countdown to Christmas Cookie Tray in the following challenges:
I choose snow, reindeer and glitter! - open til 12/9
Thank you so much for stopping by and checking out my Countdown to Christmas Cookie Tray.

Sunday, November 4, 2012

Meet Sam


Today I give you a little Halloween treat!  My husband and I created this costume and all of the props for our oldest daughter Kaitlyn.

Sam is a character from the movie "Trick 'r Treat" and he has been deemed the Halloween Mascot.  His job is to enforce the Halloween traditions; such as dressing up in costume, giving out candy and to NEVER blow out your lit carved pumpkins before midnight on Halloween.  If you don't follow these Halloween traditions Sam will find you and kill you.  You can read more about Sam: The Spirit of Halloween here.

This project was extremely difficult.  I began looking for orange footie pajamas for my daughter months ago.  With NO luck in my search, I opted to buy white footie pajamas.  My next challenge was to dye the pajamas.  Not ever dying  a single thing my entire life, I did not know that RIT dye is not recommended for 100% polyester.  Plus I didn't relize the pajamas were 100% polyester either.  So after searching the internet I did find out that there are some tricks to using the RIT dye and dying polyester. So the first orange RIT dye we tried was too light, almost a peach color. So we tried a darker RIT dye and it worked!!!  Once the pajamas were washed and dried I sewed on 2 yellow patches of felt.  The orange footie pajamas were complete!

For the head of Sam we used a technique I had found on the internet HERE!  BTW, this guy did an amazing job on his costume too!  We started off with 2 yards of burlap, cut it to drape over the shell of the head then began the stitching (a long process) and finishing it off with the button eyes.  Finally after debating how to get the burlap to lay flat on the shell, we applied a spray glue to the shell and then laid the burlap over it...it worked!!! 

We used the left over burlap to create the gloves and sack. 


Lastly I created the lollipop prop, Sam's chosen weapon.  I used George and Basic Shapes Cricut cartridge to cut out 2 circles in orange cardstock.  I hand cut the black pumpkin pieces.  I attached the black pieces to the orange circles (front and back), then hand cut the bite mark in the lollipop.  I applied Glossy Accents to both pieces and let dry.  I used a wooden dowel to create the lollipop stick.  I painted it orange and wrapped black ribbon around it.  Once the lollipop pieces were dry I used 2 thickness of foam squares between the two lollipop pieces and attached them together with the stick in the middle.

My daughter was thrilled...we pulled it off!  She told us the costume head of Sam was very hot, but since we live in Arizona that is to be expected, it might not be for someone living in a cooler climate.  On Halloween we were stopped by other parents who knew who Sam was and they asked to take her picture and another person told us she was the best costume of the night!  All of our hard work paid off and the future of this costume will become a lifesize Halloween prop. 

I am entering this costume in the following challenge:
  • Haunted Design House - HDH #157 - Hammer House of Horror - You are to ctreate a dark, Gothic, or Halloween-based art piece that is a tribute to Hammer Films.  Now I know a Sam costume may not be a tribute to Hammer Films but my love of horror films came from the many Sunday afternoons as child watching those Hammer Films.  My love for horror films still lives with me today and continues to grow every year.  
Thank you for stopping by and checking out my Sam costume and I hope you enjoyed it!

Tuesday, October 30, 2012

Halloween Witches Wreath

Today I have for you just a simple Halloween Witches Wreath.  I bought all of the supplies last year after Halloween knowing that I wanted to make this wreath.  


I'm not sure if you can see it here in the picture, but there is Martha Stewart glitter all over the hat.


Here is just a shot of my front door.


I used these items to create my Halloween Witches Wreath:
  • Wreath from Walmart
  • Broom from Michael's
  • Paper Mache hat (cut in half) also from Michael's
  • orange ribbon - that I've had forever
  • black craft paint
  • Martha Stewart glitter
  • black tulle
  • wooden dowel - just to extend the length of the broom
  • black spray paint
  • giant black and orange spider from Walmart
I am entering this Halloween Witches Wreath in the following challenges:
Thanks for stopping by and checking out my Halloween Witches Wreath.


Friday, October 19, 2012

Zombie Baby


This is my first Vitual Zombie Walk so please forgive me if I screw something up.

For as long as I can remember I have always been facinated with Zombies.  The 1st Zombie movie I remember watching was the original "Night of the Living Dead."  I was hooked at that point.  Over the years I was always amazed at the technology advances in the motion picture industry that have given us the zombies of today. If I had to choose a favorite zombie movie I would have to say the re-make of "Dawn of the Dead."  I thought the changes they made in the new film were very smart choices.  I absolutely love "The Walking Dead" series and look forward to every Sunday evening. 

Halloween is my favorite holiday.  We are usually the only house that decorates.  We like to make most of our decorations...you can see some of them HERE

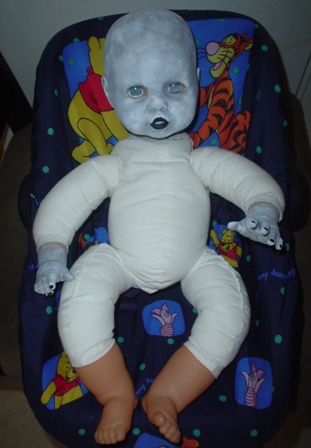
So now on to my Zombie Baby. She was brought to "life" because me and my family will be walking in the Phoenix Zombie Walk 2012, plus I found these great little brains at the Dollar Store that I knew right away would be the perfect size for a baby brain. 

Here I give you the stages of transformation:


After paint and enamel accents in her eyes.


Here I have opened her head up and inserted the brain.


I used my glue gun to ensure the brain wouldn't move and then applied the "blood."


I love this one where you can see the blood has run into her eye.


And here she is...Zombie Baby!!!


The transformation:
  • I spray painted her head and hands with gray spray paint
  • After some drying time I applied white and black craft paint with just a simple sponge
  • I then painted her lips and fingernails with black craft paint
  • I also applied Enamel Accents to her eyes
  • I then began opening up her head
  • stuffed the brain inside along with some bubble wrap so that it would keep its shape
  • hot glued the brain to the inside of the head
  • touched up paint and then applied the "blood"
I am so happy you have come this far and taken this journey with me.  I hope you enjoyed my Zombie Baby and please continue on with the Zombie Walk.
Zombies Everywhere
[Retro-Zombie]
Halloween Blues
The Southern Northerner
Martha's Journey
Annie Walls
GingerRead Review
App'y Talk
Kweeny Todd
Jenny's House of Horrors
Bubba's Place
Fictional Candy
herding cats & burning soup
Author Sherry Soule Blog
Paranormal research Group Blog
Adult Urban Fantasy by Sherry Soule
Moonlight Publishing Blog
Candid Canine
Ghost Hunting Theories
Above the Norm
A Dust Bunny In The Wind
Faith McKay
Zombob's Zombie News & Movie Reviews
Flesh From The Morgue
The Living Dark
Some One Else's Cook
Stumptown Horror
Forget About TV, Grab a Book
Zombie Dating Guide
Strange State
The Paranormalist - Renae Rude
Idée Fixe
Random Game Crafts
WhiteRoseBud's Tumblr
Gnostalgia
Book Me!
Carmen Jenner Author
Sarasota Zombie Pub Crawl
Not Now...Mommy's Reading
Love is a Many Flavored Thing
Its On Random
Ellie Potts
Attention Earthlings!
Horror Shock LoliPOP
The Spooky Vegan
The Story In...
DarkSide Detectives Blog
Something wicKED this way comes....
Julie Jansen: science fiction and horror writer
Author/screenwriter James Schannep
The Zombie Lab
Creepy Glowbugg
Pickleope
Sharing Links and Wisdom
Midnyte Reader
This Blog Has A.D.D.
Carol's Creations *** You are HERE ***
Jeremy Bates
  Vanessa Morgan

Monday, October 15, 2012

Wicked Best Witches Cauldron Treat Holder


 Tonight I bring to you a cute little treat holder that I created for my daughter's 5th grade Halloween party...28 of these cute little cauldron treat holders to be exact!  I created the base (orange part) in the Design Studio by welding them together and just cut out the coordinating pieces.


Here I applied Glossy Accents to the bubbling liquid (green part), to give it some shine.  I stamped on the front with the "Wicked Best Witches" stamp from Bug Bites Stamps  - All Year Round stamp set. 


I used a brown Sharpie marker to color the stick of the blow pop to give it the look of a big wooden spoon.  I then punched a hole through the bubbling liquid to push the end of the stick through.


I used these items to create this Halloween Treat Holder:
  • Design Studio
  • Mini Monsters Cricut cartridge - cauldron
  • Glossy Accents - on the bubbling liquid
  •  Bug Bites Stamp - "Wicked Best Witches"
  •  brown Sharpie marker - on stick of blow pop
  •  Blow Pop
  •  Glue Spots - to hold blow pop in place
  •  
I am entering this Halloween Treat Holder in the following challenges:
Thank you so much for stopping by and checking out my Wicked Best Witches Cauldron Treat Holder.