Showing posts with label buttons. Show all posts

Monday, June 30, 2014

Mr. & Mrs. Triple Heart Shape Easel card


I am sharing with you tonight a wedding card that I made using a different style of shape/easel card.  I was inspired by a pin on pinterest Triple Heart Shape Easel Card Tutorial. I made this for my niece who will be getting married in less than a year. I am super excited about the way it turned out.


I used these items to make my Mr. & Mrs. Triple Heart Shape Easel card:

  • Sweethearts Cricut cartridge - hearts and Mr. & Mrs.
  • Create a Critter Cricut cartridge - bow tie
  • black, white and lavender cardstock
  • real black buttons - from my stash
  • Stampin' Up Rhinestones 
  • Swiss Dots embossing folder
  • Stickles 
  • Fabric Fancies flowers
  • foam squares
I am entering my Mr. & Mrs. Triple Heart Shape Easel card in the following challenges and linky parties:

Sunday, April 20, 2014

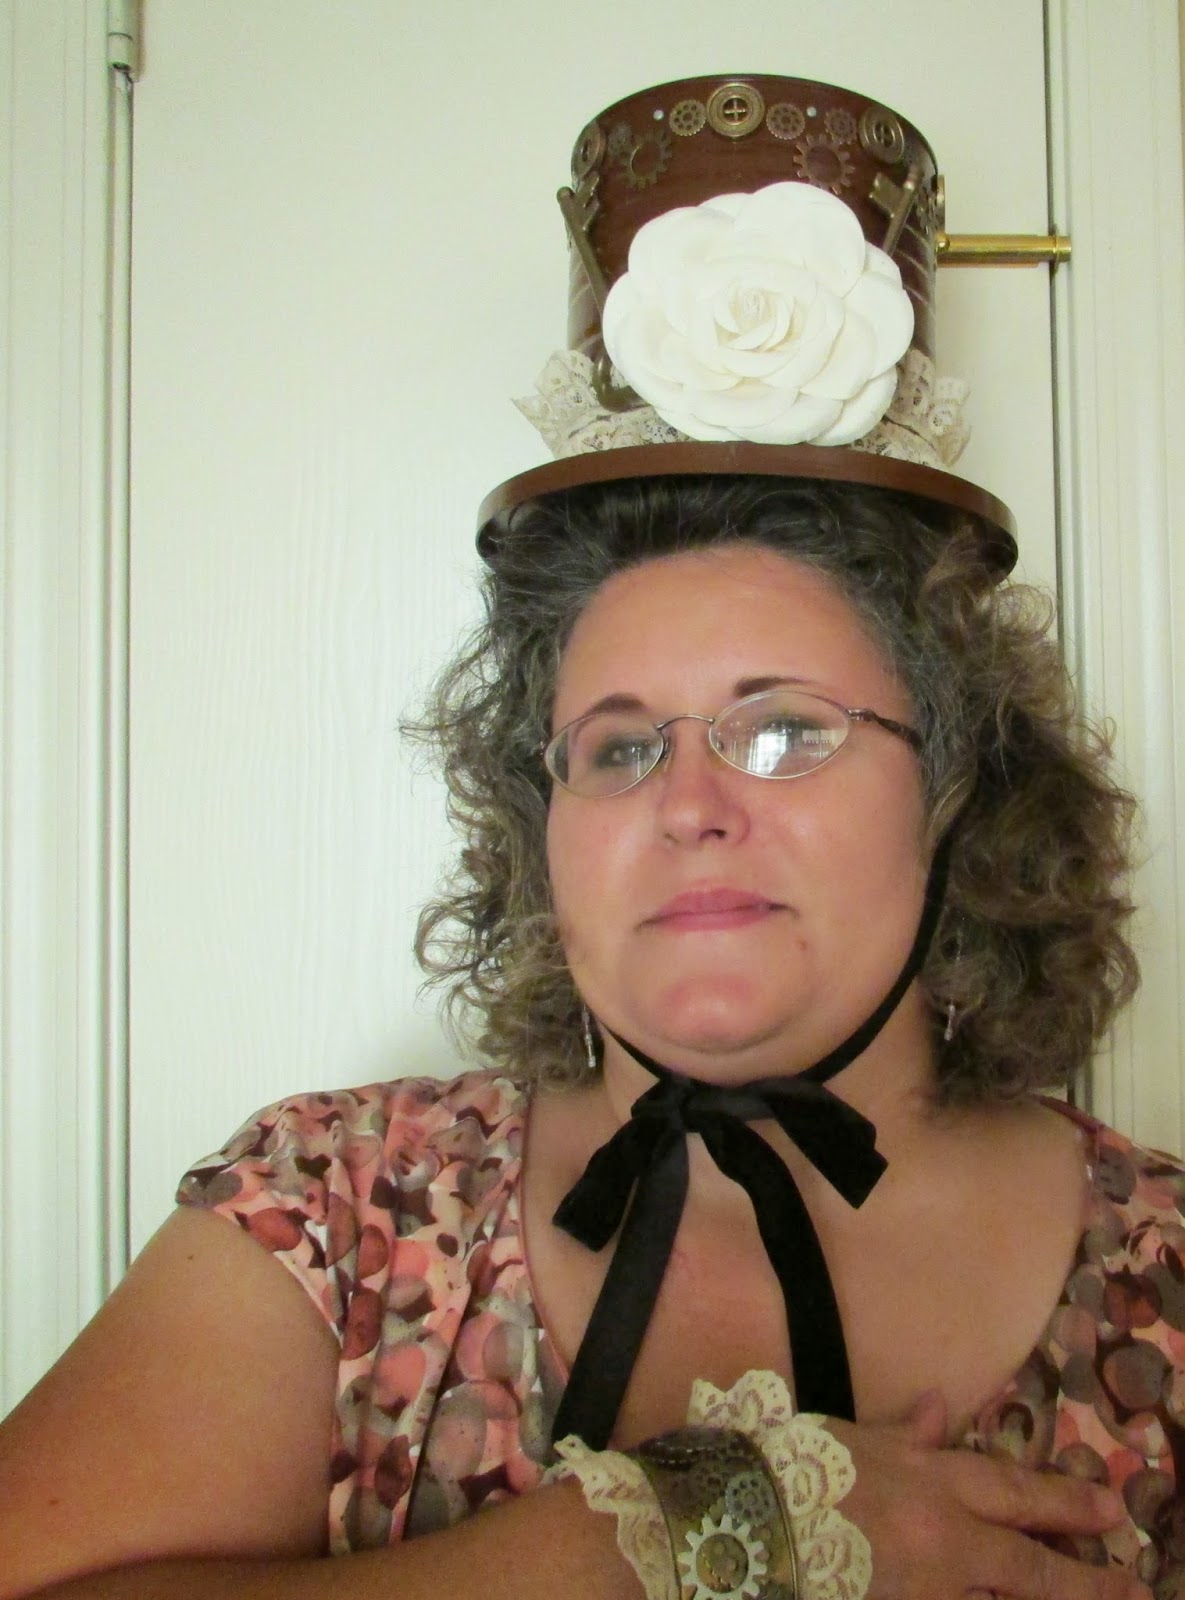
Steampunk Junk Hat and Bracelet


Finally, I am getting a chance to get this out. I have been trying to finish this project all week and now I can say it is done. Haunted Design House has a Steampunk Junk challenge going on. To be honest I originally was not going to do this challenge because I am not familiar with Steampunk, but that made it all the more interesting for me to try this challenge.

So I had all of these items on hand and they were just waiting to be made into something:


I used these items to create my Steampunk Junk Hat and Bracelette:

  • large coffee can
  • lid from ice cream bucket
  • outside case to the First Aid waterproof adhesive tape
  • Antique Gold spray paint
  • Brown spray paint
  • white lace (that I stained with coffee and tea)
  • metal keys (Michael's)
  • metal buttons (I had in my stash)
  • paper flower (Michael's)
  • black velvet ribbon
  • metal bits (Michael's)
  • brads

The Bracelet:


The Hat:


 And here is me wearing the hat and bracelet:


I am entering my Steampunk Junk Hat and Bracelet into the following challenge and linky party:
After all that, I really enjoyed this challenge and I can now say I learned what Steampunk is and I have to say, I like it!!! Thanks for stopping by and checking out my project.

Saturday, March 16, 2013

Camouflage Onesie Shape card


Last month one of my nieces had an emergency C-section and gave birth to a baby boy 11 weeks early. Baby is currantly still in the NICU but progressing very well and Mom is recovering very well also.  I knew about 2 months ago or so that the baby's bedding was going to be camouflage so I knew that when the time came I was going to use that for whatever creation I was going to make. Since the baby came early I have only been able to make a card and this is it. I totally love the way it turned out and can't wait to get involved in more baby projects using the camouflage. This is only the beginning.

Here you can see where I welded the onesie together in the Design Studio:


Here is just a close up of the inside where I did some faux stitching and stamped my sentiment:


I used these items to create my Camouflage Onesie Shape card:
  • Design Studio - to weld the onesie together
  • New Arrival Cricut cartridge - onesie
  • Pooh Font Cricut cartridge - "100 % Boy"
  • buttons
  • My Craft Spot Clear Stamps - In and Out - Set #2 - the inside sentiment
  • Baby wooden stamp - on the inside
  • green gel pen - faux stitching - on the inside
I am entering this shape card in the following challenges and linky party:
This was such a fun and easy card to make. Thank you for stopping by and checking out my Camouflauge Onesie Shape card.

Friday, March 15, 2013

Rainbow Birthday card


Today I give you my Rainbow Birthday card. A friend of mine's daughter is turning 2 this weekend and she had requested that I do a card for her like I had done for her son when he was born (SEEN HERE). Also she wanted me to incorporate her daughter's new toddler bedding SEEN HERE! I think I captured what she wanted...I am so happy with the way it turned out. What do you think?


Here you can see the dimension:
 
 
Here is the inside:


I used these items to create this Rainbow Birthday card:
  • Create a Critter 2 Cricut cartridge - rainbow and clouds
  • Celebrations Cricut cartridge - orange flower
  • Accent Essentials Cricut cartridge - pink flower
  • Pooh Font Cricut cartridge - Rosannah and 2 (on inside)
  • teal blue pen - faux stitching on pink flower
  • Stickles - clouds
  • buttons - on flowers
  • Recollections foam squares
  • My Craft Spot - Clear Stamps - sentiment on the inside of card

I am entering my Rainbow Birthday card in the following challenges and linky party:
Thank you for stopping by and checking out my Rainbow Birthday card, I hope you liked it!

Thursday, January 31, 2013

Wanna see something really scary?


I give you tonight a very unusual card. I'm hoping that you can figure out where my inspiration came from. If you were a lover of sci-fi movies from the 80's you probably know what it is. If you weren't, then I feel sorry for you. 

The movie is Twilight Zone:  The Movie (1983) and the last line in the movie is,"Wanna see something really scary?" by the very funny and famous Dan Aykroyd. The look on the other very famous actor, John Lithgow, is priceless!


A little background:

Four directors collaborated to remake four episodes of the popular television series 'The Twilight Zone' for this movie. The episodes are updated slightly and in color (the television show was in black-and-white), but very true to the originals, where eerie and disturbing situations gradually spin out of control.

I was only 8 years old when this film came out but I loved all things horror and sci-fi as a child and still do.

For more information go HERE!   

This is not your typical card...it doesn't really open, just the door on the front opens to reveal a surprise inside...a mirror.        

 
I thought it was appropriate to make this a birthday card...a funny ha ha Happy Birthday card! 

 
I used these items to create this card:
  • Design Studio
  • George and Basic Shapes Cricut cartridge - the card shape and rectangle cut for the mirror
  • Wild Card Cricut cartridge - the door
  • computer generated title
  • button - door knob
  • Martha Stewart glitter - around the opening of the door
  • plastic mirror sheet
 
I am entering this card in the following linky party and challenges:
Thank you so much for stopping by and checking out my birthday card, I hope you liked it and that I see you around my blog again!

Sunday, September 23, 2012

Crashed Witch card


Today I bring to you card I have be wanting to make forever...here it is my Crashed Witch card.  This was such a fun card to make...I forgot how much I loved making paper dolls.


I used these items to make this card:
  • Design Studio
  • Wild Card Cricut cartridge - door
  • Paper Doll Dress Up Cricut cartridge - the witch
  • George and Basic Shapes - round part of the witches hat
  • rafia - for the broom
  • shinny leaves
  • Martha Stewart glittler -  on the hat and boots
  • white ink - the dirty-up the hat and witches dress
  • black button - the knob of the door
  • foam squares - under her body and hat
  • foam tape - behind the door
  • misc. fall leaves clear stamp - inside
  • wooden witches hat stamp - inside
  • BugBites Stamps - All Year Round - inside


I am entering this card in the following challeges:
Thank you so much for stopping by and checking out my Crashed Witch card.

Sunday, September 9, 2012

Halloween Hello Kitty Shape card


Ok so Hello Kitty is cute all on her own, but when she gets dressed up in her Halloween costume she's even cuter!  I didn't want to do the traditional black, I gave her an orange tabby stripe costume.

Here's a little closer look at her black and orange glitter bow and sucker.


I used these items to create this Halloween Hello Kitty Shape card:
  • Design Studio
  • Hello Kitty Greetings Cricut cartridge
  • Martha Stewart black glitter - bow
  • Orange Stickles - bow
  • Studio G black glitter glue - sucker
  • Glossy Accents - bow
  • Orange floss - sucker
  • Buttons
  • Stampin' Up Halloween stamp - inside
Here's a look at the (simple) inside:

I am entering this card the following challenges:
Thank you so much for stopping by and checking out my Halloween Hello Kitty Shape card.

Tuesday, September 4, 2012

Breast Cancer Awareness card


Today I bring to you a card I actually needed to make for myself.  I was diagnosed with breast cancer June 29 of this year and have been taking the neccessary steps to fight it and get rid of it!!!  I have also been following this fantastic blog called Link Up for Pink.   They offer challenges directly for Breast Cancer Awareness, plus much needed encouragement and support for those who are traveling down this road.
I am entering this card in the following challenges:


I used these items to create this card:
  • ALL SUPPLIES I HAVE IN MY STASH
  • White card stock
  • 2 different kinds of pink pattern paper
  • Elegant Edges Cricut cartridge - have had for ever and NEVER used
  • Martha Stewart Punch Around
  • My Craft Spot Stamps - sentiment
  • Ribbon - given to me from the hospital during my 1st surgery
  • Button - from my stash
  • White Enamel Accents - create the look of pearls in the corners 
  • Cuttlebug
  • Swiss Dots Embossing folder
Thank you so much for stopping by and checking out my Breast Cancer Awareness card.

Sunday, July 29, 2012

Sugar & Spice ATC - My 1st ATC!!!


Ok so this is my 1st attempt to create an ATC (I hope I did it right)?  I was graciously invited to try my hand at this by Jenn over at Wicked Wednesday ATC so here it is.

I used these items to create the ATC:
  • Dilly Beans digital stamp #256-framed zombie girl with bow 1
  • colored with Sharpie Markers
  • pattern paper
  • computer generated title "Sugar & Spice" - outlined with black ink pen
  • pink gingham ribbon
  • Genuine Kids button
  • Green and pink stickles - the bow, hair, eye lid and lips
  • Pop Dots - layered the green bow in her hair
I am entering this ATC in the following challenges:
Thank you so much for stopping by and checking out my 1st ATC - Sugar & Spice

Thursday, February 2, 2012

If I couldn't have him, NO ONE WOULD!!!

For those of you have been following me might remember back in September I had displayed my Appalling Apothecary.  Well a piece of that apothecary was the heart of a (former) sinful boyfriend (in the jar to the right). 
Today I give you a little back story how that heart got there. 

My relationship with my former boyfriend was just like any other relationship, except I was in love with him but he was in love with someone else.  Once I found out about this, I felt that since I couldn't have him, NO ONE WOULD and I "took care of him!"

Here is how my memory box use to look like when were together:
Valentine's Day use to be a favorite holiday of ours until I found out that he was also planning to spend it with the other woman.  So I decided that Valentine's Day would be the perfect day for me to "take care of him!" 

I found a voodoo priestess and she instructed me how to make my very own paper voodoo doll.


Then when I knew he was with her, I did it!  I then claimed the heart that belonged to me and would NEVER belong to another! 


This was his hearts first resting place along side the wonderful memories we created together:


Now NO ONE will ever have his heart but ME!!!

I used these items to create my paper voodoo doll:
  • Wonderstrange arts Free digital image Voodoo Doll which I printed out on craft paper (to give it a burlap look) and altered by cutting off the candy cane
  • red Sharpie marker - for the heart
  • Silver Gloss paint marker - for the pins
  • white gel pen - for the heads of the pins
  • Glossy Accents - for the entire pin to give it a more realistic look
  • buttons - for the eyes
  • floss - for the eyes, mouth and around the heart
  • doily heart
  • ribbon
I am entering this Paper Voodoo Doll in the following challenges:
Ok, so obviously this is just a fictious story that I created to go along with my creation.  I hope I didn't freak you out too much!

Thursday, June 30, 2011

Grandpa and Me

I just wanted to share this layout I did a couple of years ago for my father-in-law.  My heart weighs heavy as I write this.  My father-in-law has been in the hospital for a week now with some major health issues and we are not sure how this is all going to play out.  We are praying that at least his heart gets strong enough so that we can move him to a better hospital, as for right now that is not possible.  I didn't use any Cricut on this, I don't even think I owned a Cricut yet.  I have some buttons framing some of the pictures, some felt flowers held on with brads, a butterfly, a dragonfly, a shooting star sticker, and some metal charms.  Even though my oldest daughter hasn't had a lot of time with her Grandpa (PopPop) because of living 2,000 miles away, she has had a lot of quality time with him, time that I know she will cherish forever!