Showing posts with label Easter. Show all posts

Monday, April 6, 2015

Mini Chocolate Bunny Baskets


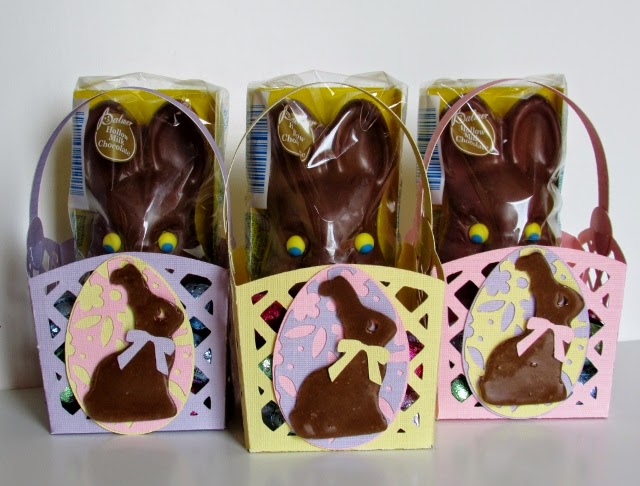
Today I bring to you these cute Mini Chocolate Bunny Baskets that I made for my daughters and my mom for Easter. I finally broke into my Tags, Bags, Boxes and More 2 Cricut cartridge. I found a very helpful video on pinterest that showed me how to use this cartridge. If you have this cartridge and are hesitant to use it because of not understanding how to use it, don't be. First, you definitely NEED the score blade to use this cartridge. Second, find a how-to video on the internet and learn the useful tips they have to offer. Last, now that you everything you need to use this cartridge jump in and have fun!

Here is a closer look of just one of the baskets:


I used these items to create my 3 Mini Chocolate Bunny Baskets:
  • Tags, Bags, Boxes and More 2 Cricut cartridge - basket cut @ 5 1/4 inches
  • Easter 2010 - egg cut @ 2 1/2 inches and bunny cut @ 2 1/4 inches 
  • Glossy accents - bunny
I am entering my Mini Chocolate Bunny Baskets in the following challenges:
I am so pleased with the way these baskets turned out. I will definitely be using the Tags, Bags, Boxes and More 2 Cricut cartridge more often, now that I understand how to use it. Thank you so much for stopping by and checking out my Mini Chocolate Bunny Baskets.

Friday, March 27, 2015

He is Risen Easter Card


I can't believe it, Easter is just a little over a week away. I didn't even have time to decorate because the holiday is so early this year and my Mom spent some time in the hospital earlier this month...plus, my oldest daughter turned 13 on the 7th. Then on St. Patrick's Day I had to take my youngest daughter to the ER to get 4 stitches under her eyebrow because she tripped in the grocery store parking lot and face planted onto the back of a shopping cart. So needless to say I didn't get to do the fun stuff I normally do for Easter. I did though just finish an Easter card that I have been wanting do for a very long time. I hope you enjoy it.


I used these items to create my He is Risen Easter Card:
  • Inspired Heart Cricut Lite cartridge - title and die cut
  • Stickles
  • purple ribbon
  • foam squares - behind image
I am entering my card in the following challenges:
Thank you so much for stopping by and checking out my He is Risen Easter card.

Tuesday, April 2, 2013

Peeps on a Stick Easter Basket


Me and my family were invited to a friends house for an Easter Eve celebration and flashlight Easter egg hunt. I knew for about 2 weeks I wanted to create a little something for the kids and our host and the Peeps on a Stick Easter Basket is what I created.


I used these items to create my Peeps on a Stick Easter Basket:
  • White basket with liner from Micheal's
  • little egg picks (which I had in my stash for many many years) that I attached to the sides of the basket
  • Styrofoam for the inside of the basket
  • wooden skewers
  • Peeps in assorted colors
  • Clear plastic bags with twist ties
  • Plastic eggs just for added decoration
I assembled my basket first. Then with the help of my oldest daughter Kaitlyn, we assembled the Peeps on a Stick. We finished them off by covering them with the clear plastic bags and placing them in the basket. I added the plastic eggs just for added color and decoration.


This project was so easy and fun. I do recommend having a helper though, one person to skewer and one person to bag. The Peeps on a Stick Easter Basket was a hit with the kids and the host. Plus, something like this cost a lot less to make than to buy...I saw just the Peeps on a Stick in the store selling for $3.00 each and the chicks were a lot smaller. I ended up making 14 sticks which cost me approximately $8.00 for the Peeps, $2.00 for the skewers, and $2.00 for the clear plastic bags...for a total cost of $12.00 for 14 sticks. Had I bought them it would have been $42.00 and this is just for the sticks. Plus, I had leftover Peeps to make additional Peep Sticks if I wanted to.  Definitely worth the money, time and effort to make this instead of buying.

Thank you so much for stopping by and checking out my Peeps on a Stick Easter Basket, I hope you liked it.

I will be entering this in the challenge at Decorate to Celebrate Challenge #47 - Easter

Sunday, April 8, 2012

Easter Bunny in a Basket Shape card

Happy Easter to my fellow crafty bloggers!!!!  I had a fantastic morning with my family at church...cooking dinner now but super tired.  I worked til 12:45am last night, came home, did the Easter stuff and went to bed around 3:30am only to turn around and get up at 6:00am to help the girls find Easter eggs and check out what the Easter Bunny left in their Easter baskets.

Today I am sharing with you my Easter Bunny in a Basket shape card.  I am super excited about how this shape card turned out...in fact now that I think about I don't think I have ever done a shape card!  I made this card for my 2 year old daughter.  This is the 1st year she will start to understand Easter and what it is all about...and of course the Easter Bunny. 


I used these items to create this card:
  • Design Studio - to weld the basket together
  • Dilly Beans digital bunny stamp
  • pink Sharpie marker - for the bunny
  • Recollections white flock - for the bunny
  • pink bow - for the bunny
  • foam squares - to give the bunny paws the appearance he was going to jump out
  • Doodlecharms Cricut cartridge - for the basket and eggs
  • ribbon - for the basket
  • Martha Stewart glitter - for the eggs
  • Brown gel pen - to create the faux stitching around the basket.


I am entering this card in the following challenges:
I know my 2 year old daughter will not appreciate this card until she is much older and that's ok, I'll keep it in a very safe place until then. 

Thank you so much for checking out my Easter Bunny in a Basket Shape card and I hope you have a very Happy Easter!

Saturday, April 7, 2012

Easter Fence Basket

This was such a fun project to make.  I wanted to create a little Easter scene and found this perfect fence box on on the Wrap it Up Cricut cartridge and this is what I made. 
I used these items to make this Easter fence basket:
  • Design Studio
  • Wrap it Up Cricut cartridge - for the fence box and grass
  • Doodlecharms Cricut cartridge - for the eggs
  • Winter Woodland Cricut cartridge - for the bunny
  • Flower brads - to attach the strip of cardstock to create the handle of the basket
  • Recollections flock - for the bunny
  • google eyes -  for the bunny
  • Pink Sharpie marker - for the bunny nose
  • Martha Stewart glitter - for the eggs
  • brown ink - to dirty-up the fence
I just added the stuffed bunny and eggs for display purposes.  I plan on giving this to my mom with some Easter candy in it.  I also thought this stuffed Easter froggie I got her would fit in it, but no he was too big.
Here are some other views of each side and an angel view to see 3D look created with the foam squares:


I am entering this Easter fence basket in the following challenges:
Thank you so much for stopping by and checking out my Easter Fence Basket.

Wednesday, April 4, 2012

Peeps Easter card

I know it's been a very long time since I last posted anything, for that matter even created anything.  My oldest daughter's birthday was earlier in the month, which I was overwhelmed with invitations, goodie bags, and everything else.  Then after that I was dealing with a very sick 2 year old and then it hit me but much worse.  Now finally I'm back!!!

 I created this card for my 10 year old daughter.  She absolutely loves Peeps and when Easter time comes around this is a must have in our house.  Another craft blogger inspired the actual design of the Peeps.  She used the bunny on Doodlecharms Cricut cartridge and welded it with a circle.  I choose to use an oval instead of the circle.  The design of this card was based on the packaging the Peeps come in, I think it turned out ok. 

I used these items to create this card:
  • Design Studio - welded the bunny from Doodlecharms Cricut cartridge and an oval to create Peeps, welded the letters for "Hoppy Easter" and welded the oval and rectangle to create the "Peeps" sign
  • Doodlecharms Cricut cartridge - bunny
  • Birthday Cakes Cricut cartridge - font "Peeps" and "Hoppy Easter"
  • George and Basic Shapes Cricut cartridge - the oval and rectangle
  • Martha Stewart glitter - to give the Peeps a surgary look
  • Brown Studio G glitter glue - eyes and nose of Peeps
  • Foam squares - to raise the Peeps
Front:

Bottom:

 I am entering this card in the following challenges:
Thank you so much for stopping by and checking out my Peeps Easter card!