Showing posts with label Glossy Accents. Show all posts

Monday, August 21, 2017

Fantabulous Cricut Challenge # 308 - Vacations

 Happy Monday and welcome to another Monday challenge!


Challenge #308-Vacation
Make a project about vacation!

The FCCB Design Team is sponsoring a $25 gift card at

Amazon!

To qualify for the prize, be sure to use at least 1 Cricut cut on your project and if it's not obvious, let us know what cartridge you used. If you use a Cricut Explore machine, at least one cut must be from the Cricut catalog of images.

If it isn't a card, you will get two entries into the drawing!

Here's my Project:


My ex got a motorcycle a year or so ago. His birthday was this past Saturday so I made him this birthday card that looks very similar to his motorcycle. I know it doesn't quite represent a vacation but it could in the future.
 
I used these items to create my motorcycle card:
  • Father's Day Cricut cartridge - motorcycle
  • George and Basic Shapes Cricut cartridge - rectangle for sentiment
  • Black, white and red cardstock
  • 2 types of foil paper
  • brads
  • Glossy Accents
  • Black ink
 
I am entering my motorcycle card in the following challenges:
 
Thank you so much for stopping by and checking out my vacation project. Make sure to go to Fantabulous Cricut Challange Blog and enter your vacation project.


Monday, July 24, 2017

Fantabulous Cricut Challenge # 306 - Anything Goes

 Happy Monday and welcome to another Monday challenge!


Challenge #306-Anything Goes!
Create a project that features anything in the Cricut Library!

This Weeks Sponsor


The prize is 4 digital stamps!

To qualify for the prize, be sure to use at least 1 Cricut cut on your project and if it's not obvious, let us know what cartridge you used. If you use a Cricut Explore machine, at least one cut must be from the Cricut catalog of images.

Here is my Project:


So I have kind of been really liking these décor pieces. I have now created 3, including this one. I have decided that I am going to create a décor piece for every season and every holiday. My youngest daughter has been really enthusiastic about helping me with them too. She is 7 and likes to press buttons. This is the décor piece we created for Summer.
 
 
I used these items to create my Summer Décor Project:
  • Life is a Beach Cricut cartridge - waves, bikini, beach ball
  • Pooh and Friends Cricut cartridge - sun
  • Create a Critter Cricut cartridge - sand castle
  • "Just Because" Cards Cricut cartridge - watermelon
  • Stretch Your Imagination Cricut cartridge - Summer
  • Doodlecharms Cricut cartridge - popscicle
  • Create a Friend Cricut cartridge - pool
  • Glossy Accent - on the popscicle
I am entering my Summer Décor Project in the following challenges:

Monday, April 6, 2015

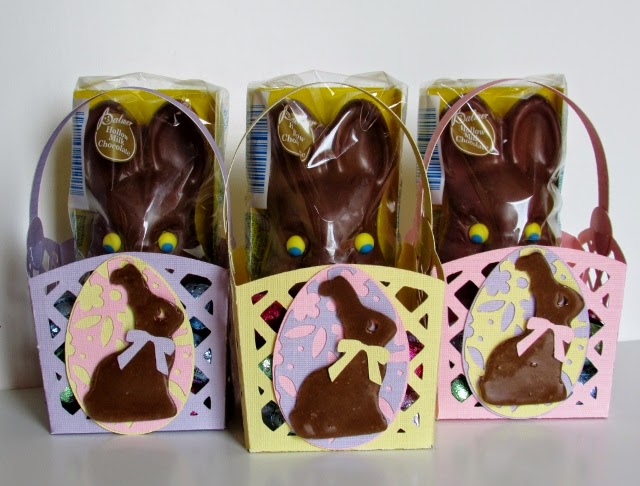
Mini Chocolate Bunny Baskets


Today I bring to you these cute Mini Chocolate Bunny Baskets that I made for my daughters and my mom for Easter. I finally broke into my Tags, Bags, Boxes and More 2 Cricut cartridge. I found a very helpful video on pinterest that showed me how to use this cartridge. If you have this cartridge and are hesitant to use it because of not understanding how to use it, don't be. First, you definitely NEED the score blade to use this cartridge. Second, find a how-to video on the internet and learn the useful tips they have to offer. Last, now that you everything you need to use this cartridge jump in and have fun!

Here is a closer look of just one of the baskets:


I used these items to create my 3 Mini Chocolate Bunny Baskets:
  • Tags, Bags, Boxes and More 2 Cricut cartridge - basket cut @ 5 1/4 inches
  • Easter 2010 - egg cut @ 2 1/2 inches and bunny cut @ 2 1/4 inches 
  • Glossy accents - bunny
I am entering my Mini Chocolate Bunny Baskets in the following challenges:
I am so pleased with the way these baskets turned out. I will definitely be using the Tags, Bags, Boxes and More 2 Cricut cartridge more often, now that I understand how to use it. Thank you so much for stopping by and checking out my Mini Chocolate Bunny Baskets.

Monday, March 30, 2015

Here's to You! 21st Birthday card


It is so hard to believe that my niece is going to be 21 years old. I remember the day I got the call from my brother telling me she was born. A lot has happened in those 21 years. All I can do is hope and pray that her life is filled with many blessings and she continues to become more of the wonderful woman she already is.

So I created this fun 21st birthday card. I knew immediately that I wanted to use the Wild Card Cricut cartridge simply for the champagne bottle card. I was though very intimidated by this cartridge, manly because I just didn't understand how to figure out the size. I did a little research on pinterest and found great tutorials and then I just jumped right in and this is what I came up with.

 
I created the look of the champagne exploding by using rhinestones


I gave this piece some dimension with some foam squares


Here I cut and layered 6 pieces of kraft cardstock and 1 piece of cork pattern paper to make this look like a realistic cork.


This is what I did with the inside. I put some repositionable glue on the back of the bottle so when it is closed it will actually stay closed. 


I used these items to create my Here's to You! 21st Birthday card:
  • Wild Card Cricut cartridge - champagne bottle card cut and all coordinating cuts @ 6 inches
  • Designer's Calendar Cricut cartridge - 21
  • Glossy Accents - on the bottle
  • Stampin' Up rhinestones - to appear as the champagne exploding from the bottle
  •  Cardztv Stamps - "Good Times" stamp set - on the bottle and the inside
  • Foam squares - behind the 21
I am entering my card in the following challenges:
I am so please with the way this card turned out and I am finally not intimidated by the Wild Card Cricut cartridge. Thanks for stopping by and checking out my Here's to You! 21st Birthday card

Monday, March 16, 2015

Minnie Mouse 4th Birthday Shape card


Today a very special girl turned 4 years old and yesterday she had a Minnie Mouse party so I, of course, had to create a Minnie Mouse card. I decided to make the #4 into a shape card and add on this adorable Minnie dressed in pretty pink and white polka-dots. I also used some brand spankin' new clear stamps called "Good Times" from CardzTV, which I won from a challenge I participated in. I used the simple sentiment "Happy Birthday" on front and "May all your birthday wishes come true" on the inside of the card. I added a little shine and dimension to Minnie shoes by applying some glossy accent to them. I also added some dimensional foam to the back of Minnie before adding her to the front of the 4, to make her pop a little bit. 


I used these items to create my Minnie Mouse 4th Birthday Shape card:
  • Nate's ABCs Cricut cartridge - 4
  • Mickey and Friends Disney Cricut cartridge - Minnie
  • CardzTV "Good Times" clear stamp set - sentiment on front and on inside card 
  • Glossy Accents - on Minnie's shoes
I am entering my card in the following challenges:
I am super excited how this card turned out and I hope you like it too! Thanks for stopping by and checking out my Minnie Mouse 4th Birthday Shape card.

Tuesday, September 30, 2014

Elmo Crayon Box


So there is a sweet little boy who just turned 2 and I wanted to make something special for him. Since we were only giving him some toys my youngest daughter was donating to him and some money, it had to be something different. I was going to make a pop-up box card but I thought, I already did that earlier in the year for his sister. I knew he liked Elmo so I flipped through some of my Sesame Street and Elmo Cricut cartridges and found alot of things I liked. I decided that the size of the crayon box on the Elmo's Party Cricut cartridge was perfect to not only hold a box of crayons but the money too and that is what I decided to do.


I used these items to create my Elmo Crayon Box:

  • Elmo's Party Cricut cartridge - Elmo crayon box cut @ 8 inches and all layers
  • Martha Stewart red (ladybug) flocking powder - on Elmo's face 
  • Glossy accents - on the crayons
  • Black pen - on the crayons
  • My Craft Spot clear stamp set - In & Out Set #2 - Happy Birthday and back sentiment
  • black and white ink


I am entering my Elmo Crayon Box in the following challenges:

This was such a fun and easy project. Thank you so much for checking out my Elmo Crayon Box.

Saturday, September 20, 2014

Party Time Layout


I created this page in record time today, about 3 hours, and that included drying time for the stickles and glossy accents. I made this for a birthday gift for a friend of my daughter's. The birthday sleepover was tonight and I needed to get it done in a hurry. I spent all week taking care of my mom and her house that it was just not possible to even look at it until this morning. I was a little bummed because I thought I had a nicer zebra print paper but I couldn't find it or I had already used it. I am though very happy with the way it turned out.

I created a hidden tag for journaling.


Here are just some more close ups:


I used these items to create my Party Time Layout:
  • Life's a Party Cricut cartridge - pink and zebra cuts and "CELEBRATE"
  • Tags, Bags, Boxes and More 2 Cricut cartridge - tag
  • Pink and black stickles
  • White gel pen
  • foam squares - behind the "CELEBRATE"

I am entering my Party Time Layout in the following challenges:


Saturday, August 16, 2014

Smile, Swing on over to Celebrate Jaidyn's 3rd Birthday Shrek 2 Party 2 page layout


Today I bring to you my Smile, Swing on over to Celebrate Jaidyn's 3rd Birthday Shrek 2 Party 2 page layout. This didn't start out as a 2 page layout but here it is and I think it works.

Page 1 is "Smile" because this page describes the photos I took of Jaidyn for her invitation. I actually did some hidden journaling behind the camera. Basically I made the camera into a shape card...pretty cool I think!


The journaling says, "It was October 30, 2012 and I had to get a good photo of Jaidyn for her 3rd birthday party invitation. So we went out front, with her favorite green shirt on, and I attempted to get a good photo. But Jaidyn would look everywhere but at me. The best one I got is the one in the frame. This is also the one I had put on her invitation. Not the greatest picture but definitely shows Jaidyn's personality." 

I also used an "old school" tool on the wooden frame. I used a texture plate called carpet to make the wooden frame look like tree bark instead of using the easy to use embossing folders.

I used these items to make "Smile" page 1:
  • Shrek napkin and treat bag from the birthday party
  • Pooh and Friends Cricut cartridge (1st time I used this cartridge) - for the frame
  • Dreams Come True Disney Cricut cartridge - slime splat
  • Create a Critter Cricut cartridge - camera
  • Phrases Cricut cartridge (1st time I used this cartridge) - "smile"
  • Brown, green, black and silver cardstock
  • Fiskars texture plate (carpet) (1st time I used this plate)- on the frame
  • Brown ink and marker - on the frame
  • Brads - on the frame
  • Glossy Accents - on the slime splat and camera lens
  • Foam squares - under the slime splat and camera
Page 2 is the Swing on over to Celebrate Jaidyn's 3rd Birthday invitation page , it displays the invitation I had made with one of the photos I took on page 1. One other cool thing I did was I used items from Jaidyn's party to create both pages. I used one of the napkins for the main images and a treat bag with Shrek on it. These were such fun pages to make...I really glad I kept those party items.


I used the items to make the Swing on over to Celebrate Jaidyn's 3rd Birthday Shrek 2 Party page 2:
  • Shrek napkin
  • Christmas Cheer Cricut cartridge - trees
  • 2 different colors of green and teal cardstock
  • Brown ink - on the trees
  • PARTY metal tag 
  • The actual invitation from Jaidyn's party

I am entering my Smile, Swing on over to Celebrate Jaidyn's 3rd Birthday Shrek 2 Party 2 page layout in the following challenges and linky parties:
Thank you so much for stopping by and checking out my Smile, Swing on over to Celebrate Jaidyn's 3rd Birthday Shrek 2 Party 2 page layout.

Friday, February 28, 2014

Happy Birthday Pop Up Box Card


My oldest daughter is turning 12 next month so of course I had to make a card. Recently I have seen these amazing Pop Up Box Cards and I just had to try it. I think I did ok for my 1st try.

Here are some close ups:


This is how it looks when it is closed and folded to fit in a envelop:


This is how it looks when opened:


This is the backside:


I used these items to create my pop up box card:
  • Tutorial from Splitcoast Stampers
  • Color Bok Day Glo cardstock
  • black and white cardstock
  • misc. pattern paper I've had forever
  • Birthday Cakes Cricut cartridge - balloons, Happy Birthday and presents
  • Celebrations Cricut cartridge - 12
  • Glossy Accents - on balloons
  • Stickles - on Happy Birthday, presents and 12
  • Cricut Embossing folders: Tiny Bubbles and Spot/Dots - on presents
  • My Craft Spot - Inside & Out - Set 2 stamps - the backside sentiment
I am entering my pop up box card in the following challenges and linky parties:
Thank you so much for stopping by and checking out my Pop Up Box Card.

Sunday, February 9, 2014

Be My "Bloody" Valentine Candy Box


I am super excited to share with you today my Be My "Bloody" Valentine Candy Box with a little surprise inside. This is for sure not your traditional box of chocolates for a traditional Valentine. Since my favorite show, "The Walking Dead" comes back on tonight I just had to pay tribute to it. So I created a triangle candy box, decorated it with a Valentine flare and some "blood splatter." Then I hit the kitchen and made some candy coated Oreo brains for the surprise inside.


I used these items to create the Candy Box (ALL of which have been in my stash for quite some time):

  • Sweet Tooth Boxes Cricut cartridge - triangle candy box cut at 9 1/4
  • Cake Basics Cricut cartridge - heart cut at 9 1 /2
  • Wild Card Cricut cartridge - Be my Valentine
  • red lace
  • red craft paint - "blood splatter"
  • Glossy Accents

I used these items to create the surprise inside (ALL of which I had on hand too):
  • Wilton Cookie Candy Mold
  • Oreo cookies
  • Wilton Candy Melts - red, pink and white
I am entering my Be My "Bloody" Valentine Candy Box in the following challenges: