Pages

Sunday, April 29, 2012

Class of 2012 High School Graduation layout


Today I share with you a layout I made as part of a gift for my neice who is graduating high school this May.  Her school colors are Red and Grey.  The only bit of grey I have is apart of the photo mats, everything else I went with the red. 

For the top part of the title I used my Design Studio to weld on the cap to the "C."  The scroll/diploma is acutally just a small peice of cardstock, rolled and tied up with floss.  I also used glitter and glossy accent to the title and stars.


I used a black fine point marker to highlight the cap and gown image then added glossy accent.  The same goes for the caps at the bottom of the layout as well..


I used these to create this layout:
  • Design Studio
  • PlantinSchool Cricut Cartridge - the font
  • Everyday Paper Dolls Cricut Cartridge - the cap and gown
  • Wild Card Cricut Cartridge - the stars
  • Martha Stewart glitter - the letters and stars
  • Glossy Accents - the letters, stars, cap and gown
  • ribbon - 2012 and Graduation
  • 2012 bling
  • foam squares - for all Cricut cuts except the title
  • floss - for around the "diploma"
I am entering this layout in the following challenges:
Thank you so much for stopping by and checking out my Class of 2012 High School Graduation layout.

Jeepers Creepers easel card


Today I bring to you a very, very early Halloween card.  Halloween has always been my favorite holiday and I have no problems creating projects early for it.  My inspiration came from the challenge over at Haunted Design House - Macabre Monday  The challenge is HDH130 "Eye Can See You."  You are to create a dark, Gothic, or Halloween-based art piece that is to use eyeballs or optical themed images.

I started looking through some old craft magazines and noticed someone had used the title "Jeepers Creepers" and WHAM...I have it, the idea for my card.  I decided to use the lyric from song and this is what I came up with.


I used these items to create this card:
  • Design Studio
  • Computer generated font - for the "Jeepers Creepers where'd ya get those...Peepers"
  • Doodlecharms Cricut Cartridge - for the jar
  • Happy Hauntings Cricut Cartridge - for the "Happy Halloween"
  • Martha Stewart edge punch - for the slim
  • Google eyes
  • Glossy Accents - for the slim in and out of the jar and the "Happy Halloween"
  • Misc. stickers


I am entering this card in the following challenges:
Thank you so much for checking out my Jeepers Creepers card!

Sunday, April 8, 2012

Easter Bunny in a Basket Shape card

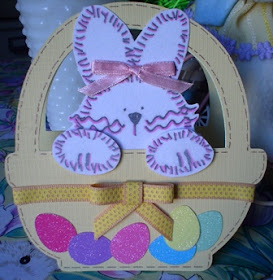
Happy Easter to my fellow crafty bloggers!!!!  I had a fantastic morning with my family at church...cooking dinner now but super tired.  I worked til 12:45am last night, came home, did the Easter stuff and went to bed around 3:30am only to turn around and get up at 6:00am to help the girls find Easter eggs and check out what the Easter Bunny left in their Easter baskets.

Today I am sharing with you my Easter Bunny in a Basket shape card.  I am super excited about how this shape card turned out...in fact now that I think about I don't think I have ever done a shape card!  I made this card for my 2 year old daughter.  This is the 1st year she will start to understand Easter and what it is all about...and of course the Easter Bunny. 


I used these items to create this card:
  • Design Studio - to weld the basket together
  • Dilly Beans digital bunny stamp
  • pink Sharpie marker - for the bunny
  • Recollections white flock - for the bunny
  • pink bow - for the bunny
  • foam squares - to give the bunny paws the appearance he was going to jump out
  • Doodlecharms Cricut cartridge - for the basket and eggs
  • ribbon - for the basket
  • Martha Stewart glitter - for the eggs
  • Brown gel pen - to create the faux stitching around the basket.


I am entering this card in the following challenges:
I know my 2 year old daughter will not appreciate this card until she is much older and that's ok, I'll keep it in a very safe place until then. 

Thank you so much for checking out my Easter Bunny in a Basket Shape card and I hope you have a very Happy Easter!

Saturday, April 7, 2012

Easter Fence Basket

This was such a fun project to make.  I wanted to create a little Easter scene and found this perfect fence box on on the Wrap it Up Cricut cartridge and this is what I made. 
I used these items to make this Easter fence basket:
  • Design Studio
  • Wrap it Up Cricut cartridge - for the fence box and grass
  • Doodlecharms Cricut cartridge - for the eggs
  • Winter Woodland Cricut cartridge - for the bunny
  • Flower brads - to attach the strip of cardstock to create the handle of the basket
  • Recollections flock - for the bunny
  • google eyes -  for the bunny
  • Pink Sharpie marker - for the bunny nose
  • Martha Stewart glitter - for the eggs
  • brown ink - to dirty-up the fence
I just added the stuffed bunny and eggs for display purposes.  I plan on giving this to my mom with some Easter candy in it.  I also thought this stuffed Easter froggie I got her would fit in it, but no he was too big.
Here are some other views of each side and an angel view to see 3D look created with the foam squares:


I am entering this Easter fence basket in the following challenges:
Thank you so much for stopping by and checking out my Easter Fence Basket.

Friday, April 6, 2012

Me...Top 3 over at Little Scrap Pieces!!!


I am so honored to have been chosen as part of the Top 3 over at Little Scrap Pieces.  I was given this honor for my Peeps Easter card and the challenge they had over at Little Scrap Pieces. 

The challenge was to use one of your favorite crafting items on your project or post a picture of your favorite stamp, glue, ribbon, punch, ink,cartridge, embossing folder - be a follower and leave a comment telling why it's your favorite.  This is what my comment was, "This was very hard for me to choose just one favorite crafting tool but I chose my Cricut Design Studio. I use it for almost every Cricut project, plus I wouldn't have been able to create these cute little Peeps without it (well I could have used the Cricut Craft Room but I haven't updated in a very long time). Thanks for this great challenge!"

Thanks again for chosing me for your Top 3 at Little Scrap Pieces!!!

Thursday, April 5, 2012

Monster High T-Shirt made by 10 year old daughter!

So this post is not my typical post. In March my oldest daughter turned 10 years old and we had a Monster High birthday party.  She recieved many different kinds of Monster High related gifts and this T-Shirt Design Set was one of them.  Today she created this T-Shirt.


This T-Shirt is being entered in the Forever Night - Creepy Kids Challenge - Monster High theme - anyone under the age of 16 can enter.

Now here she is, my daughter Kaitlyn wearing the shirt!
Thank you so much for stopping by and checking out my daughter's Monster High T-shirt!

Wednesday, April 4, 2012

Peeps Easter card

I know it's been a very long time since I last posted anything, for that matter even created anything.  My oldest daughter's birthday was earlier in the month, which I was overwhelmed with invitations, goodie bags, and everything else.  Then after that I was dealing with a very sick 2 year old and then it hit me but much worse.  Now finally I'm back!!!

 I created this card for my 10 year old daughter.  She absolutely loves Peeps and when Easter time comes around this is a must have in our house.  Another craft blogger inspired the actual design of the Peeps.  She used the bunny on Doodlecharms Cricut cartridge and welded it with a circle.  I choose to use an oval instead of the circle.  The design of this card was based on the packaging the Peeps come in, I think it turned out ok. 

I used these items to create this card:
  • Design Studio - welded the bunny from Doodlecharms Cricut cartridge and an oval to create Peeps, welded the letters for "Hoppy Easter" and welded the oval and rectangle to create the "Peeps" sign
  • Doodlecharms Cricut cartridge - bunny
  • Birthday Cakes Cricut cartridge - font "Peeps" and "Hoppy Easter"
  • George and Basic Shapes Cricut cartridge - the oval and rectangle
  • Martha Stewart glitter - to give the Peeps a surgary look
  • Brown Studio G glitter glue - eyes and nose of Peeps
  • Foam squares - to raise the Peeps
Front:

Bottom:

 I am entering this card in the following challenges:
Thank you so much for stopping by and checking out my Peeps Easter card!