Sunday, October 30, 2011

Kaitlyn's Halloween Spider


My 9 year old daughter Kaitlyn loves to create just as much as I do and she seems to have a knack for recycling/repurposing things around the house.   Kaitlyn happened to be going through some of my craft supplies and found a piece of floral foam that was left over from a previous project and decided she wanted to make something of it...and this is what she made!

Kaitlyn used these items to create this spider:
  • floral foam
  • black craft paint
  • toothpicks
  • black tinsel-like balls
  • google eyes
  • white foam sheet
  • fancy fur yarn
  • floss
  • tacky glue

Kaitlyn painted the foam and toothpicks with black craft paint.  She glued on the little black tinsel-like balls to the ends of the toothpicks and inserted the toothpicks into the foam.  Kaitlyn then glued on the google eyes.  She then cut out 2 teeth from some white foam sheets and glued them on.  Lastly, Kaitlyn glued on the fancy fur yarn around the body of the spider and some black floss to hang it from.


We are entering this project into these challenges:
I think she did an amazing job and best of all this was all her creation...no help needed from Mom!

Wednesday, October 26, 2011

Kaitlyn's Monster Treat Bags

Well, after my daughter created her 1st treat bag she wanted to make more and she did just that.  Kaitlyn decided to make a monster treat bag for all the kids in our cul-de-sac, a total of 8 monster treat bags!!!   Each treat bag was created in different color combinations, one specifically designed for each kid.  Kaitlyn made all of these by herself, I only helped her by putting on the ribbon.

Here's a view of some of the ribbon we used:


These items were used to create these treat bags:
  • Cricut cartridge Mini Monsters - for the treat bag cut at 5 1 /2
  • misc. ribbon
  • google eyes
  • eyelets

We are entering these treat bags in these challenges:
Thank you so much for looking and we hoped you enojoyed Kaitlyn's Monster Treat Bags!

Monday, October 24, 2011

Bat Hanging from a Tree Halloween Easel card


A friend of mine had asked me to make a card for her to give to her nephew for Halloween.  I racked my brain and couldn't decide on what to make.  I decided to ask her to come over and we'd create it together and this is what we came up with. 

We used these items to create this card:
  • Design Studio
  • Cricut cartridge Simply Charmed
  • My Moments Peel n' Stick ribbon
  • white gel pen
Here's just a view of the card:
Here is a close up of the front (you can really see the embossing):

We had a great time creating this card together and I'm sure her nephew will love it!

Sunday, October 23, 2011

Froggy Witch Halloween Easel card

Hey there fellow crafters I have a card I am sharing with you today that I created for my mom for Halloween.  My mom loves frogs...in fact in her backyard, by her pool she has frog land.  You'll find all types of frogs there, all except for real ones.  I knew right away what froggy I wanted to use and of course it would have to come from one of my favorite cartridges *Creat-a-Critter*


I am entering this card in these challenge:

I used these items to create this card:
  • Design Studio
  • Cricut cartridge Creat-a-Critter - for the frog
  • Cricut cartridge Happy Hauntings - for the hat
  • Martha Stewart punch - for the inside of the card
  • google eyes
  • Cuttlebug
  • green and purple stickles - the hat and frog
  • misc. stickers - for the inside of the card
  • My Moments peel n stick ribbon
  • open stock pattern paper from Hobby Lobby
Here's an up close view of the froggy's hat.  I show you this because my 9 year old daughter suggested I emboss the hat to make it look like the hat on the paper and this is how it turned out.  I think she had an excellent idea and it works perfectly.


Here's an up close view of the inside:

Thanks for looking and I hope you enjoyed my Froggy Witch Halloween Easel card!

Thursday, October 20, 2011

One Eyed One Horned Flyin' Purple People Eater*Treat Bag*

I think the title says it all...this is my One Eyed One Horned Flyin' Purple People Eater * Treat Bag* I created it for a few challenges and because I LOVE these little treat bags!!!

I created this little guy in Design Studio but I had to make a few modifications to him before I could cut him.  He is cut at 6 in. but I hid the eyes so I could give him just one eye.  I also had to give him a horn, which is actually a welded on ice cream cone from Once Upon a Princess.  The rest is all cut normally.

I used these items to create this treat bag:
  • Design Studio
  • Cricut cartridge Mini Monsters -  for the treat bag
  • Cricut cartridge Happy Hauntings - for the hand
  • Cricut cartridge Once Upon a Princess - for the horn
  • google eye
  • Purple stickles
I am entering this little guy in these challenges:
Here's a view of him without the candy:
And here's a view of him up close:


I totally recommend Mini Monsters to any newbie...the images are cute, fun and easy to layer!!!
Thanks for looking and I hope you enjoyed my little One Eyed One Horned Flyin' Purple People Eater * Treat Bag*

Link Up Love Party with K Andrew

It is time once again for the monthly Link Up the Love Party! It's a great way to find new blogs, share your blog, and encourage the love all over blog land!

Link Up Love Party: How it Works

*Link Up Party runs from Tuesday 10/18 to Tuesday 10/25. Winners announced 10/31
*Grab my blinkie and post on your blog's sidebar
*Be a follower of this blog
*Create a new blog post that is titled Link Up Love Party with K Andrew. In your post, you must mention that the link up love party is a way to get to know each other and find new blog inspiration, mention my blog, with a link back to my blog .
*Post your favorite project that you've done in your blog post THAT HAS TO DO WITH HALLOWEEN!!  That could be a card, layout, treat holder or decoration, anything halloween related.
*Copy and paste the link up code into your blog post so the Inlinkz will show up on your blog
*Spread the word so everyone can join in!
*You must visit, follow, and comment on the 5 people before you AND the 5 people after you in the Inlinkz. It would be fantastic if you would visit as many as you can--maybe everyone? If you are one of the first 5 then you will need to blog the ones before you and a few more after--as long as it's a minimum of 10 near you in the link up tool/gadget)
If you do not do the above your link will be deleted, because it's just not fair to those who work so hard linking up and showing love to the ones on the list. I have two moderators who will be checking this out to keep it awesome and fun!


Link Up Party: Giveaway! A FULL year subscription to the best scrappy magazine out there: Creating Keepsakes for TWO lucky followers who Link up and play correctly. Winner will be announced October 3'rd so make sure you come back to see if you won!!!! Remember, if you dont' claim your prize within ONE week, it goes back in to the pot!

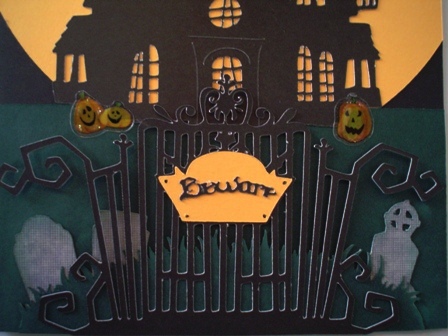
Here is my project that I am linking up.  This is a card I created a couple weeks ago and I just feel in love with those Bone Buddies.

 You can find more out about this card HERE!!!  Thanks for looking and I hope you join me in the link up party!!!


Wednesday, October 19, 2011

Beware - Haunted House card - HDH #111 Lurid and Looming Landscapes

Hey there fellow crafty bloggers.  I just wanted to share a card that I did this week for a co-worker.  I had already sold her 2 of my Halloween cards and then I showed a sketched that I did for this one and she said she wanted that one too once I made it...and here it is!

I am entering this card in these challenges:
Here's a look at the house a little closer...scary ghosts flying about!!!

I used these items to create this card:
  • Design Studio
  • Cricut cartridge Happy Hauntings for everything except the moon
  • Cricut cartridge Accent Essentials for the moon
  • misc. pumpkin stickers
Here's a close up of the gate and what's is that beyond the gate but a couple a graves:

I really like the way this card turned out...I think I captured what I wanted and I hope my co-worker thinks so too! 

Thanks for looking!  Happy crafting!

Saturday, October 15, 2011

Creepy Globugg Halloween Blog Candy

Creepy Glowbugg Halloween Blog Candy
This is only just a small part of what is being offered for Blog Candy...come on over and take a look!

Haunted Design House: 500 follower Hallowe'en Blog Candy

Haunted Design House: 500 follower Hallowe'en Blog Candy: The Haunted Design House is nearing a huge milestone. Nearly 500 followers!!!!  And this is what you could win!  So come join the fun!

Friday, October 14, 2011

A Little Something Personal About ME!

Today I'm going to share with you little something personal about myself...I have 4 children; 2 who walk along side me and 2 who soar above me.   The month of October everyone seems to be very focused on Breast Cancer Awareness but for me it is about October 15th - Pregnancy and Infant Loss Remembrance Day.

January 9, 2005 my entire world shattered!  I was 29 weeks and 6 days pregnant with my son Aiden and something went wrong.  I had a complete placental abruption without the usual symptoms and my son Aiden was stillborn.  Through a support group called Compassionate Friends we found The Miss Foundation.  My husband and I attended a support group through them for several years.  We still attend and participate in annual events and fundraisers. 

The 1st year of grief was the hardest and then I also had it compounded by a second loss.  I was fortuate to get pregnant again 9 months after lossing Aiden.  Then after 8 weeks I began to miscarry.  I miscarried naturally after a couple days after it had started.  I named that baby Kiran.

I carry the grief of lossing Aiden and Kiran with me every day.    I don't know what I would have done without the support of The Miss Foundation.  Some days are better than others and then some days like Saturday have been weighing heavy on my heart all week.

If you are interested in learning more about my angels Aiden and Kiran, and about their stories please visit Aiden's Website **** WARNING **** THIS IS A VERY SENSITIVE MATTER AND THERE ARE PICTURES POSTED THAT ARE NOT SUITABLE FOR ALL VIEWERS **** 
Thank you in advance if you have taken the time to read a little bit about me and if you do visit Aiden's website!

Thursday, October 13, 2011

Kaitlyn's Spooky Treat Bag

Kaitlyn is my 9 year old daughter and when I got my Expression a couple of years ago she inherited my Baby Bug and she has been non-stop creating.  She created this little treat bag ALL by herself.  I only tied the ribbon on for her.

These items were used to create this treat bag:
  • Cricut cartridge Mini Monsters - for the treat bag cut at 5 1 /2
  • Cuttlebug
  • D'vine Swirls embossing folder - for the black belly of the treat bag
  • ribbon
  • google eyes
  • eyelets
Here's a close up look at the embossing on the belly:


We are entering this project in a couple of challenges:
Thanks for looking and my daughter would love to see your comments!

Tuesday, October 11, 2011

Halloween Owl Easel card

I'm sharing today a card I made for my mother-in-law.  She is a HUGE fan of owls and I wanted to make her a card for Halloween, especially this year because it is the 1st Halloween since her husband passed away.  I really just wanted to let her know that we are thinking of her, even on a silly day such as Halloween. 

I am also entering this card in a couple of challenges:

I used these items to created this card:
  • Design Studio
  • Create-a-Critter Cricut cartridge
  • Cuttlebug
  • Swiss dots embossing folder - used on the outer layer of the owl
  • Script texture embossing folder - used on the tree limb
  • Stickles - black and purple on the owl
  • Circle stencil - used to hand cut out the moon
  • E-Z Rub On - for the bats on the moon
  • Black, orange, 2 types of purple, white cardstock
  • Pattern Paper - from Recollections Midnight Magic

The inside I used these items:
  • white cardstock
  • black brads
  • Martha Stewart corner punch
  • misc. Halloween stamps
Thank you so much for looking!

Saturday, October 8, 2011

HDH #109 - Inner Workings

I created this 3D coffin to enter into the challenge over at Haunted Design House - HDH #109 Macabre Monday - Inner Workings.  The challenge was to create a dark, Gothic, or Halloween-based art piece that either is quite literal (clock works or guts) or just simply decorate the inside of your project as well as the outside.  I personally will NEVER be buried out of my fear of bugs...I HATE ALL THINGS CREEPY CRAWLY!!! 

Here's a look at what's inside:


The "inside" of my coffin represents the "inner-workings" of the coffin and what happens to the body after a long period of time.

Here's a close up...I just love that little skeleton!


I used these items to create this 3D coffin:
  • Design Studio
  • Life's a Party Cricut cartridge - 3D coffin (measuring 7 1/2 inches in length) and the inside of card feature
  • Indie Art Cricut cartridge - for the cross on the top of the coffin
  • plastic skeleton from a Halloween garland
  • Red fabric from an old costume and polyfil for the bed of the coffin
  • Martha Stewart crushed red flock for the inside, top of coffin and red craft paint
Thanks for looking!  I hope you enjoyed my little project!

Friday, October 7, 2011

For All You Zombie Fans...you'll get a kick out of this!

Over at Buy Costumes.com they had this under the Zombie costumes...I thought it was too funny and had to share.

Zombie Costumes

In the event of a zombie apocalypse, BuyCostumes.com has provided you with a comprehensive survival guide to keep you from being left 4 dead…or undead, if you will.
Whether you’ve encountered an old-fashioned voodoo-gone-wild zombie, or a modern virus-infused zombie, one thing is for certain: You want to turn Mr. Tall, Dark and Living Dead into Mr. For real, No questions about it, dead-dead. The only way to do this is to destroy its brain. Machete or machine gun, you’ll find that everyone puts their own swagger on the zombie-killing business.
The crazies come in all shapes and sizes. First you have your slow, shambling types (“Easy Kills”, as we like to call them). Comprised mostly of those aforementioned voodoo zombies, the majority of their effectiveness comes from the shock-and-awe factor. They don’t move much faster than molasses in Wisconsin winter, but they can frighten people into submission. But not you. With the help of BuyCostumes.com, you’re a zombie-hunting machine!
Next up are the rabid virus zombies. These reanimated corpses are fast and dangerous! There’s no shuffling along Main Street for these guys. They stalk their prey, have super-charged cardiovascular systems (you better limber up!), and always seem to pop out of nowhere when the plot is running a little thin. Definitely not a novice zombie kill, you may have to settle for a shot-out knee cap in order to make your escape.
The good news is that for now, we’re safe. Present-day zombies are generally cubicle-bound and pose no threat outside of meaningless post-it note office pranks. But for those brave souls that dare to laugh in the face of the seemingly inevitable Z-DAY, you’ve come to the right place. An almost endless selection of zombie costumes and accessories, for both kids and adults, is not more than a click away! BuyCostumes.com hosts a thrilling inventory of zombie costumes for events like zombie pub crawls, zombie walks and even the spontaneous, decaying-in-action Zombie Flash Mob!
Are you a bit more unique than your tattered counterparts? There is a zombie costume for everyone! Grab a Mohawk wig, some studded accessories and Voila! London’s calling the punk rock zombie. Something old, something decayed, something dead, something frayed – zombie brides always get their groom of gloom. Want an excuse to wield a knife? Lab coats, stethoscopes and surgical masks – BuyCostumes.com has just what the Zombie doctor ordered!
Don’t let your night of the living dead become a thriller! BuyCostumes.com has zombie costumes and accessories to help you blend in. The zombies are coming. Are you prepared?

Wednesday, October 5, 2011

Two Gory Chicks: 1st Annual Halloween Giveaway!

Two Gory Chicks: 1st Annual Halloween Giveaway!

Looks really interesting and right up my alley!!!

Bone Buddies in a Boneyard

The Halloween season is upon us yet once again and it's my favorite time of year!  I was originally creating this card for a particular challenge but I missed it...oh well!  I am though going to enter this card in a couple of other challenges and they are:
I used these items to create this card:
  • Design Studio
  • Happy Hauntings Cricut cartridge - for the skeletons, one of the gravestones, the grass and the Witch
  • Paper Doll Dress Up Cricut cartridge - for 2 of the gravestones
  • George and Basic Shapes Cricut cartridge - for the moon
  • white ink - to marblize the gravestones
  • ribbon - for the the banner the witch is flying
  • star stickers
  • foam squares - to give layers to the grass
  • Here's a look at the inside:
I used these items for the inside:
  • Martha Stewart corner punch
  • Happy Hauntings Cricut cartridge - for the gravestone
  • misc. Halloween stickers
  • clear stamps
Thanks for looking and I hope you enjoyed my Bone Buddies!!!
    

Tuesday, October 4, 2011

It's an Elmo Party Part 2 - Banner


I'm finally getting some decorations done for my daughter's 2nd birthday, which is in November.  I finished the table centerpiece a week ago or so, you can view it HERE!  I was also working on this banner during the same time but just couldn't finish it until now.  Having an almost 2 year old and a 9 year old keep me extremely busy so trying to get anything done that I want to do is always a challenge.  I hope to get more done this week, especially a sample invitation, a game board and yard sign.  So be on the look out for some additional items for our Elmo Party to come!

I used these items to create this banner:
  • Design Studio
  • Elmo's Party Cricut cartridge
  • Stampin' Up ribbon
I'm entering this in Decorate to Celebrate Challenge #9 Baby Birthday
Here are a couple more images:


Thanks for looking!

Saturday, October 1, 2011

Check out this Blog!!!!

Please check out this blog http://chelemom.blogspot.com/2011/10/wcmd-giveaway.html she has a wonderful giveaway going on!!!

World Card Making Day - Surprise Inside Birthday Card

I created this card in Design Studio.  I wanted to create a card that when you opened it there was an unexpected surprise inside and I think I did with this card.  The card is a 6 x 6 square card that opens in the middle.  I only used Birthday Cakes Cricut cartridge.  I used the Cuttlebug with the Swiss Dots embossing folder on the ribbon of the present and went over the dots with a white gel pen and did some faux stitching around the green edges of the presentI used a Happy Birthday stamp from My Craft Spot stamp set.  Last I added some buttons to 2 opposite corners. 

Here's the surprise on the inside flap...a cute little pink monkey that is stamped with Love You, also from My Craft Spot.  Again I used the Cuttlebug and embossed the face and belly of the monkey with the Swiss Dots embossing folder.  I adhered some tiny google eyes to the monkey and some dots done with a white gel pen.
On the inside I cut out the Happy Birthday phrase, adhered all the layers and added some dots with the white gel pen.  I also did some faux stitching around the middle panel just to make it stand out a bit more. 
Thanks for stopping by and I hope you liked my little surprise inside card!